Showing posts with label updates. Show all posts

Tuesday, May 6, 2014

More Flowers

   I had another slight deviation in my Etsy-to-Fingers Project. I've been dying to recreate this design for my fingers, so I made it in to an Etsy set and painted it on my fingers yesterday.


   I originally painted it on my toes. I'm almost embarrased to show it, but here it is. They look so different! I think the lines on the leaves make the most difference.


   I was inspired by The Illustrated Nail. I saw a nail wheel of hers on Pinterest and fell in love. Her designs are all so cool!


   This one took a lot longer than my first attempt. I definitely knew more of what I was doing this time around. Thanks to Wonderously Polished's wonderful tip about polish thinner, designs are so much easier to make!


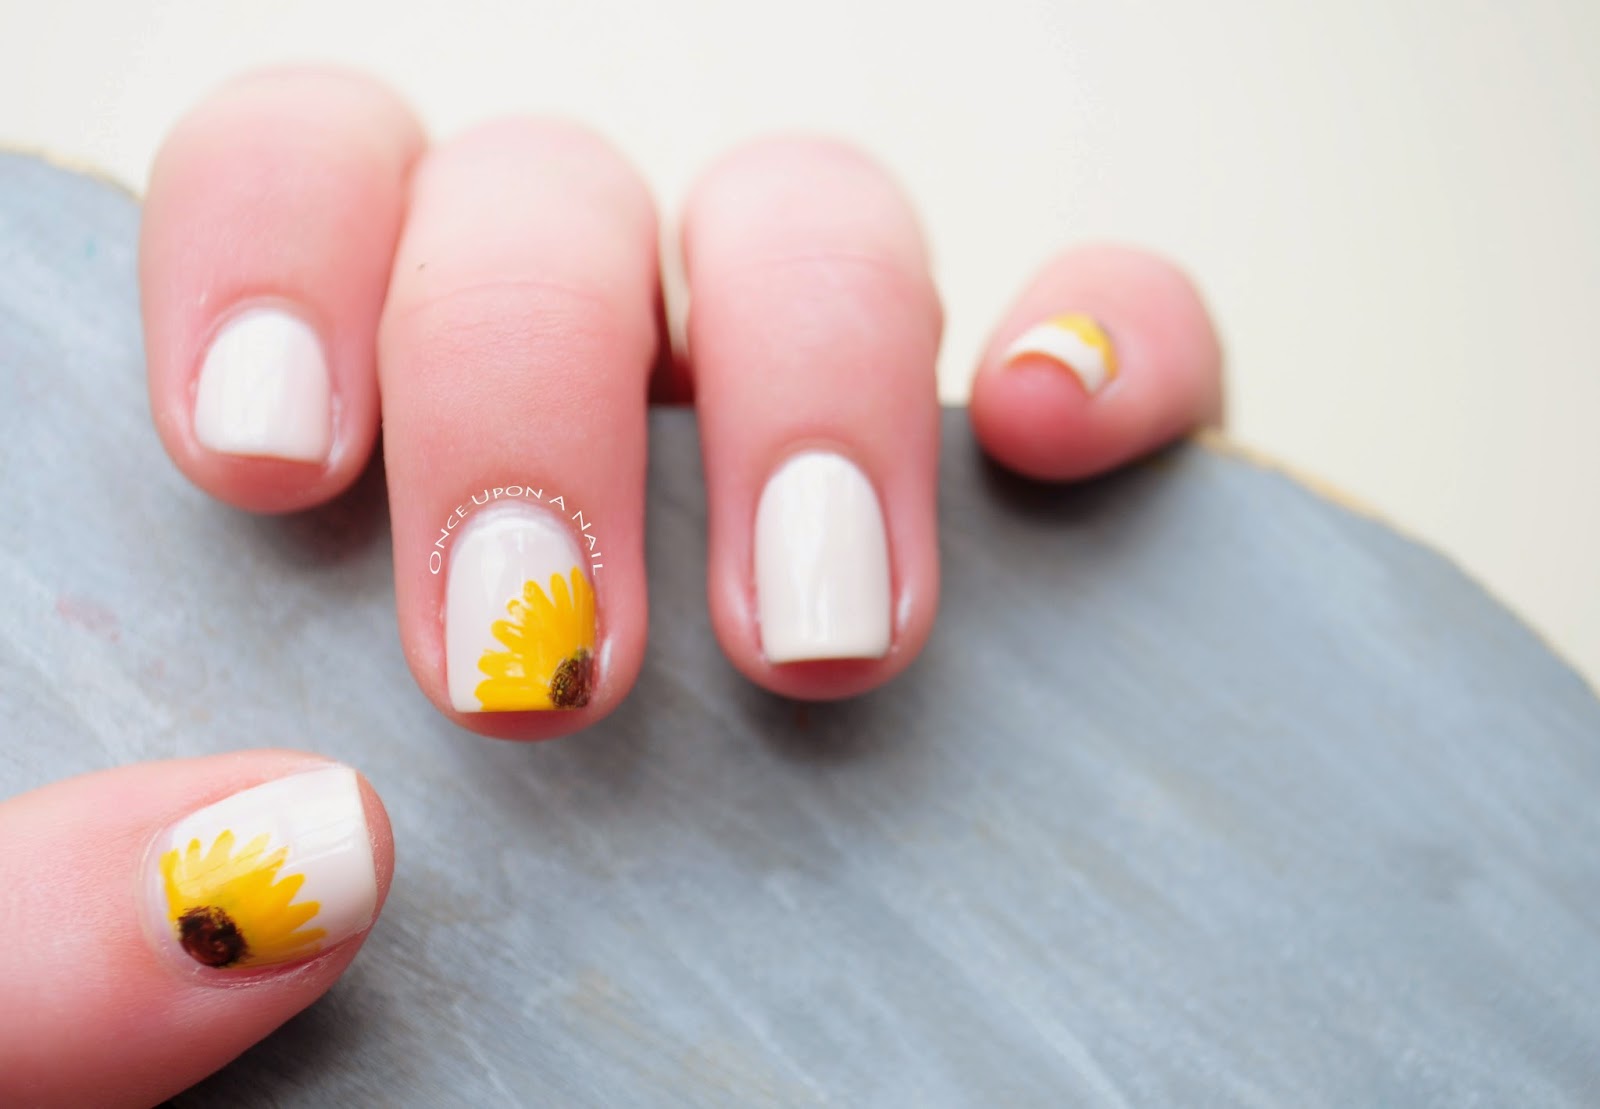
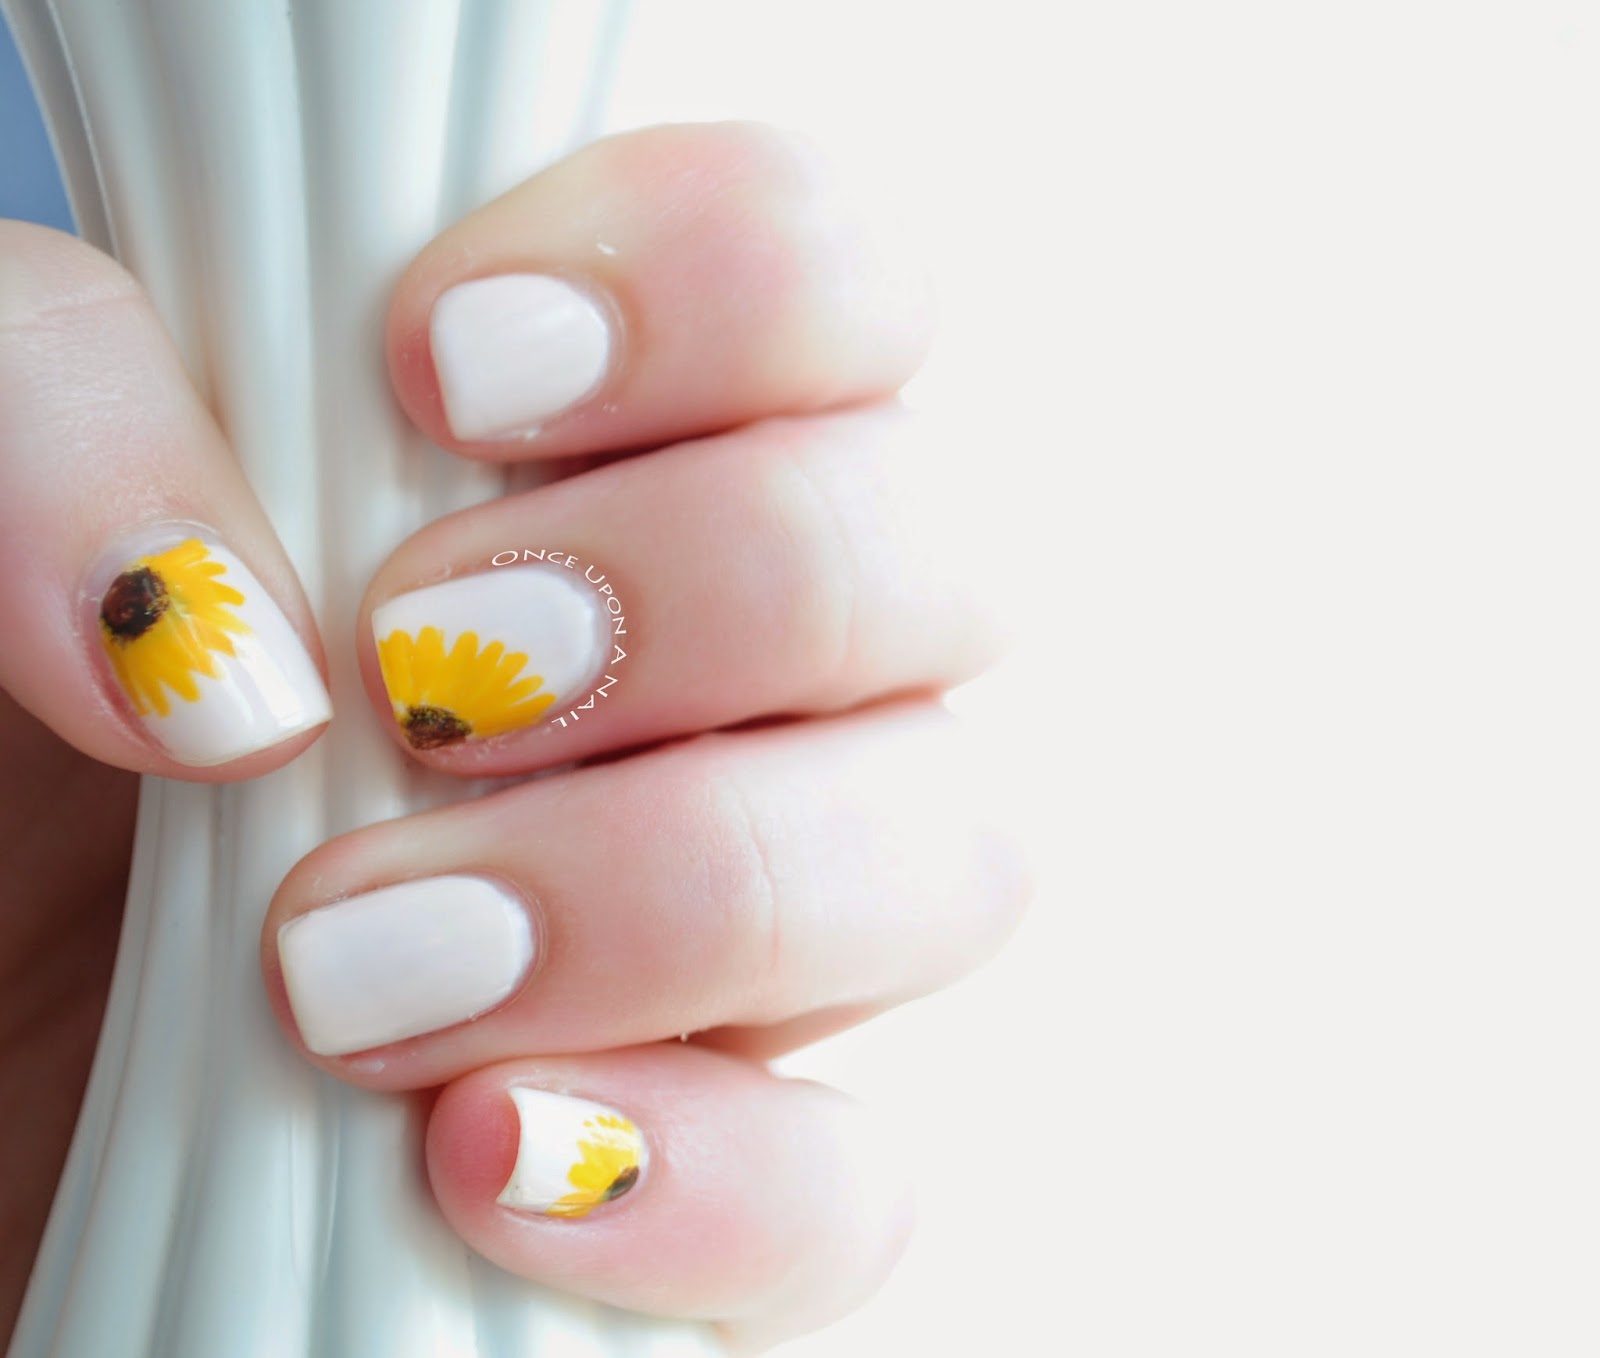
   I used some of my new polishes for this design. Sally Hansen Xtreme Wear Mellow Yellow was my base. For the flower I used Sally Hansen Xtreme Wear Coral Reef. Revlon Brilliant Strength Entice is the green middle and my red Stripe Rite striper was used for the flower outlines. The purples in the very middle of the flower were China Glaze Sweet Hook (light) and CoverGirl Outlast Vio-last (dark). The leaves were made with L'Oreal New Money as the light base, and my new Revlon Parfumiere Balsam Fir as the dark outline.


   As I mentioned, I did make this into an Etsy set! I'm not sure whether to hope that people buy it or not, it was a ton of work! But it's so pretty, I can't help but want to let other people wear it if they want. It was fun to paint too, so the time doesn't really bother me. I'll just watch movies and have fun!


   You can find the set here in my store.

   In other news, I've started a tumblr! It will have pretty much the same thing as my Facebook (a shorter version of this blog). I'll probably throw in some other junk every now and then, like some pictures of these cute baby birds we have living in the space in between the floor of our top deck and the roof of the lower deck.

   I have some more updates coming later this week, I think.
   I hope you all have a great week!

Saturday, April 12, 2014

Sunflowers

   I have several things to show you this week! This is the first of three. (I don't want to make one post and have it be super long, so I'm dividing them up! And one of the designs might still be in progress...)
   I am sort of, but not really, deviating from my Etsy-to-Fingers Project (I keep changing the name, I know - I've always been terrible with names). I've recreated an older design that I painted on my toes for my brother's wedding.


   I really like it! Simple, yet pretty. And it helps that sunflowers are one of my favorite flowers! I originally wanted to put in some greenery on my pointer and ring fingers like on the original, but I just couldn't make it look right. After having it on for a whole day and sleeping on it, I like it best how it is. Maybe if I ever needed to dress it up I could add some swirly vines or something, but I really like it simple.


   This is the original. The green looks really nice in there with the sunflowers. But, in case you hadn't noticed, toes are really big! You can fit all sorts of stuff on them! Unlike fingernails. At least, mine at any rate.


   I bought some new polishes the other day, which is what brought about this design. I had wanted to recreate the toe design for Etsy for a while, but I had run out of the tan-ish color I had used (Sally Hansen Hard as Nails Sheer Vanilla over a white base). After looking around a bit, I settled for the color you see - Revlon Colorstay Pale Cashmere. I really like Revlon's Colorstay and Brilliant Strength Polishes. They go on really nicely and last pretty long.
   For the sunflowers I used another one of my favorites for the petals - Sally Hansen Complete Salon Manicure Butterscotch. I just really love those buttery yellows! For the centers of the sunflowers I used Finger Paints Sketchy Character. I applied them both with a small brush.
   Then to finish it off, I applied my new topcoat that I splurged on - Seche Vite. It's really nice and worth the $8 result wise. However, I'm not sure if I'll continue buying it. For one, $8 is a lot of money for one bottle, especially if you're cheap like me. The biggest issue for me though is the smell. It really stinks! It's super strong and hangs around. I might get used to it, we'll see....


   As I mentioned, I made this into an Etsy set. You can find it here, if you like. I might play around with it and add an option for swirly vines... I'm not sure yet! For now, it's just going to be simple.

   More updates to come! I've finally painted my toenails again, and I've got a couple commissions coming up too...

   I've had the entire weekend off for the first time in, well, probably ever, and it's been great! I've been busy sanding some chairs for my apartment next year. I'll be painting them white to match the base of my table. I'll have to take some before and after pictures to show you guys whenever I finish! I've got four to sand and paint, so I'm sure it will be a while.
   I hope you all have a marvelous weekend/week!

Tuesday, April 1, 2014

New Listings!

   Hey guys! I've been busy this week creating new listings and working on orders, so I've got lots to show you all. Hopefully I'll get a true day off on Saturday to do other stuff. I don't know what I'll do yet, but it won't be nails or JoAnn's! Don't get me wrong, I love nail art, but everyone needs a break! I feel like I've been working on orders non stop lately! Which is good really, since it give me some money. :) 
   Speaking of orders, I'VE HIT 100 SALES!!!! It's so exciting! I think I've had about 56 actual orders, but I've sold 109 individual sets.

  I've added two new sets and have started changing my listing pictures, so my shop is starting to look a little different. It's exciting! Just because I can, here are some screen shots:


   I'm about halfway through painting all my sets! Hopefully by summer (or at least the end of it) I can start painting other stuff on my own nails again.
   This was my project this morning, getting all the solids photographed.


   I've finally gotten around to putting up a polka dot set! It's been on my to-do list for ages, I just never got around to it, like usual.


   I have several different color options:


   Wouldn't want to give you too many choices... :)  You can find the listing here.
   The colors I used are:
         Pure Ice Bikini
         Orly Teal Unreal
         Loreal New Money
         Loreal Royally Reinvented
         OPI Vant To Bite My Neck
         Finger Paints Paint Me Happy
         Sally Hansen Xtreme Wear Cherry Red
         Finger Paints Paper Mache
         Sally Hansen Xtreme Wear Black Out

   I also listed a version of my Valentine's nails. I made all the nails the same checked design instead of having the lace heart accent.


   I absolutely love this design! I think it's so cute. You can find the listing here.
   To make this design I used Finger Paints Paper Mache as my base. Then with a small brush I painted on the green 'stitching' with Revlon Brilliant Strength Entice. After that I used my dotter to start the hearts and a brush to finish them. Then I covered it all with my top coat - Revlon Multi Care Base+Top Coat.

   That's about all my news for now. I still have earrings to blog about, but I have to take pictures of them first... Maybe I can do that Thursday or Saturday. We'll see how that goes...

   I hope you all have a fantastic week that isn't too crazy!

Thursday, January 9, 2014

Dots, Leaves, and News

   I hope you all had a fantastic Christmas and New Year! I really enjoyed my time with the family!
   A few days after Christmas I had the wonderful opportunity to do and art trade with the lovely Anjuli over at Digital Designs on Etsy (https://www.etsy.com/shop/digitaldesignss). It was tons of fun! I made her some red snowflake nails and she made me this awesome 'R' that has the names of my relatives on the Roberts side of my family.


   She does fantastic work, so if you're into this sort of thing you should definitely go check her out!

   I also got to paint several people's nails over the past few weeks. While this isn't something I normally do - I don't know much about anything except painting; I don't do any of the prep work you get at a salon (mostly I'm just not to that point yet and don't want to get into that to often. Yet.) - I really enjoyed doing it!


   Top left: Some cute little wintery penguins with bows on their heads
   Top right: Christmas minions
   Bottom left: Snowman, glitter, and snowflakes
   Bottom middle: Santa's belt
   Bottom right: Santa's face

   I hadn't done anything on my own nails until this week! Partially because of the gel polish that stayed for two weeks, but mostly because I was busy running back and forth between work and visiting with family. This Christmas was so much busier than the last (for me, at least), but it was still just as great. I was going to do the winter birds like I had originally planned, but lack of time and design distractions made me paint something else! I found this cool design when I was looking through some business card templates at moo.com.


   I fell in love with it! So I painted my own version of it on my nails a few days ago. I knew I only wanted it as an accent nail, but I didn't want to leave the other nails completely plain. I couldn't really think of anything great, so I slapped some dots on there!


   I also had this glitter that I was dying to use, so I put some of it on my left hand.


   I used Sally Hansen Salon Effects Butterscotch and Revlon Colorstay Jungle for the base coats. For the leaves I used Loreal New Money and Tea and Crumpets, then Revlon Colorstay Jungle for the stem. For the dots I used the same as for the leaves, plus the Butterscotch. On my left hand the glitter was an Orly  Mini Glitter. I've yet to find a name on the bottle, but the number is 0125112.

   That's it for now. I have a ton more to show you (I've made up some new sets for my Etsy!), but I don't want to make this post ridiculously long. Hope you all have an wonderful day!

Friday, August 2, 2013

Embroidered Cards

   This is yet another off-subject post. I really do try to keep focused on nails, but I just can't help myself!
    My newest artistic endeavor is embroidering cards! I had these blank card-shaped bits of card stock lying around my room, and they were pretty lonely. I had been trying to think of how I wanted to decorate them and yesterday it hit me! I wanted to embroider them! But I had no idea how.... So after lots of research I finally figured it out! I found this awesome post about how to embroider cards (apparently you have to poke all of the holes before hand, which makes it super complicated if you want to do anything more than a regular stitch!). It was super helpful! I also found this amazing site that shows you step by step (with awesome, helpful pictures) how to do millions of different embroidery stitches! It's awesome!
   So far I've made three cards and am thinking up a fourth. I think I'm probably going to put them up on my Etsy to see if people like them. If they seem to do good, I'll make more and maybe open up a different shop for them so I don't have this random mish-mash of stuff in my current store. :)

   Here are some pictures!


  In other fun news (still not nails, sorry), I have a new (to me, anyway) old fairy tale book! Fairy tales are my weakness, and so are old books, so I absolutely can't resist an old book of fairy tales! Last week I bought an old book full of French fairy tales (it's written in English though, so I can read it!) from 1869. 1869! My oldest book yet for sure. Before this one my oldest was 1896 or so. And it's in pretty good condition. The front cover is barely held on by a bundle of threads on the inside, but other than that and one loose page the binding is great! It's amazing! 
   It's interesting though, because instead of the fairy tales being 5-15 pages like you usually see them, they're lots and lots of pages and have chapters! In my book there are only around 5 tales, but it's a decently thick book. I haven't started reading it yet (I'm waiting to finish my current book), but I can't wait! I'm so excited!

 
   I got so sidetracked raving about its awesome-ness, that I forgot to tell you guys the name! It's called (predictably) French Fairy Tales and was written by Madame la Comtesse de Segur. I absolutely loved her dedication! It reads:

To my Granddaughters,
Camille and Madeline de Malaret

My very dear children:
Here are the tales with which you were so well pleased, and that I promised you to have published.
In reading them, dear little ones, think of your old grandmother, who, to please you, has left her seclusion, and offered to public criticism the name of 
Comtesse de Segur 

   Isn't that great? She loved her grandbabies for sure! :)


   That's about it for now. And I might be getting a little sleepy...

   Have a wonderful night! (Or day, depending on where you are)  :)

Tuesday, July 16, 2013

I Now Have A Sister!!

   So as you might know, last week was all about getting ready for my brother's wedding. I talked about it a little in this post and the one before it. The wedding was Saturday and everything went really well! No major mishaps, and no crazy brides/moms/grooms/anyone. And now I have a sister! Finally! :)

here's a wonderfully grainy picture I stole from facebook of the newlyweds :)

   Anyways, I don't really have any new nail designs for you guys yet (I've still got what remains of my bridesmaids nail design on), but I do have some nail-related stuff to show you all. Just because I can, I thought I'd show you guys how I packaged the other bridesmaids' fake nails. I'm a little proud of the packaging. Just a little. :)
   I conveniently had two of the small boxes I use for my Etsy store at home, so I spruced them up a little.

 
   I wish I could do this for my Etsy orders, but I think the flowers would come off or get ruined or something. To make the flowers, I cut of a length of a paper streamer, rolled it, then glued it (I used regular old Elmer's glue). Then I kind of did the same thing to make the leaves, except I left a corner un-rolled. I used water colors to make it green, but I'm sure just a green streamer would work too (I only had white). Then I used my trusty old Elmer's glue to glue everything to the box!
   Then, as a nice touch (I do include this in my Etsy orders), I wrote on some paper!

 
   Usually my Etsy orders say something boring like 'Thanks for the order!' But now I might do something more like this instead.... I used some sort of fancy border/hole punch I bought at Micheal's and then wrote on them with my colorful inks! (I don't think I've mentioned this before, but I love calligraphy/illuminations and inks and older looking calligraphy pens!)
    Then, underneath it all are the nails. They don't always get to the final location looking this neat, but I do try to keep them in order! 


   And that's about it! I don't usually use red boxes, because on my Etsy orders I use a ribbon that is a pretty teal-ish color that looks awful with the red. But red was what Hobby Lobby had, so red was what I got! And it looks fine with white flowers, so that worked out great. :)

   Well, that's about it for now. I should have another nail design sometime this week. I'm going to the aquarium with my cousin, so I think I'm going to make some fishy nails! I've made some Finding Nemo nails for my Etsy store, so I might do those since I haven't painted that on my actual nails yet. Or I might do something different, we'll see!

   Have a lovely day/night guys!

Tuesday, June 4, 2013

Random Updates

   No new nail stuff yet. I've been busy creating graphic designs and reorganizing impossibly stuffed cabinets. I'll probably have a new nail post for you guys tomorrow or Thursday. Or maybe later...

   As you might already know, I absolutely love period clothing! If you've been on my Pinterest page, you know that I have about a billion boards dedicated to it! I just love to look at it, and if I was allowed, I'd love to feel the fabrics too! I think mostly what I like about them is that they are so elegant and detailed. They are just the coolest things to look at! I also like to sometimes wonder about who wore them and what they did...
   In light of that, I have a new project I'm going to start! I don't know if any of you guys have seen some of the amazing works of Isabelle de Borchgrave, but she is amazing! She makes life-sized period dresses out of paper! She is absolutely amazing! Here are some examples of her work:


   I'm thinking about making something like it except on a much smaller scale. It would probably fit on a Barbie or something.  I'm planning on making a dress from the late 1860s. I was hoping to make on from the 1880s, but I think the 80s will be a little too complicated for my first paper dress. This is kind of what I'll be basing my dress design off of:


   I literally have no idea what I'm doing with this project... I have never done anything like this before! So it might look decent or it might be absolutely terrible! We'll find out!
   I also have no idea when this project will be completed, but I'll keep you guys posted!