So I think I might need to take a short break from blogging. It's
been at least a month since my last post. I am still painting, but not
like I used to be. It's just hard to find the time!
Here's what I've done since I last posted.
It's not much, I know. I hardly have time any more for painting
detailed designs, and when I do, I'm often too tired to think clearly
about a pretty design. :(
I'll try to post at least a photo update every now and then.
In the meantime, I should be able to keep my instagram fairly up-to-date, if you want to check there periodically.
Hopefully I'll have more time soon!
I hope you all have a great week/month/year!
Showing posts with label glitter. Show all posts
Tuesday, June 7, 2016
A Long Overdue Update
labels:
flowers,
glitter,
holographic,
nature,
spring
Friday, May 6, 2016
On the Grid
I am behind again... But, this week was busy with Derby Day and going home over the weekend, that I don't have a design on my nails this week anyway.
Last week I was inspired by a super cute dress sold by Simplicity Is Bliss Vintage on Etsy (@sibvintage on Instagram). I love the pattern! It's so simple, yet cute.
My design is cute, but I personally think that the dress is way cuter.
I started with a base of Essie Mademoiselle, a nice sheer nude. Then I drew the lines and X's on with black polish and my favorite super thin brush. The glitter was from China Glaze Silver of Sorts.
I hope you all gave a fantastic week!
Last week I was inspired by a super cute dress sold by Simplicity Is Bliss Vintage on Etsy (@sibvintage on Instagram). I love the pattern! It's so simple, yet cute.
My design is cute, but I personally think that the dress is way cuter.
I started with a base of Essie Mademoiselle, a nice sheer nude. Then I drew the lines and X's on with black polish and my favorite super thin brush. The glitter was from China Glaze Silver of Sorts.
I hope you all gave a fantastic week!
Sunday, April 24, 2016
Client Flowers
I've had my first nail art client! It's so exciting to be coming closer and closer to what I want to do with my career.
She loved the flower nails from my last post, so I painted a variation of it on her nails. Like mine, I had not base color. Hers were made with a gel base. The pink flowers were made with an OPI color almost the same shade as Revlon Colorstay Cardshark (I forgot to write down the name for you guys). After adding the glitter, I added two coats of the gel topcoat, to make sure all of the glitter texture was smoothed out.
I hope you all have a wonderful week!
(If you're in the Louisville area, come see me! I work at Classique Nails and Spa on Westport Rd.)
She loved the flower nails from my last post, so I painted a variation of it on her nails. Like mine, I had not base color. Hers were made with a gel base. The pink flowers were made with an OPI color almost the same shade as Revlon Colorstay Cardshark (I forgot to write down the name for you guys). After adding the glitter, I added two coats of the gel topcoat, to make sure all of the glitter texture was smoothed out.
I hope you all have a wonderful week!
(If you're in the Louisville area, come see me! I work at Classique Nails and Spa on Westport Rd.)
Tuesday, April 19, 2016
Spring Flowers
Now that we are officially out of winter (the season and the weather!), be prepared to see a lot flowers from me. Probably every other week... :D
This was inspired by babynail_nagoya on Instagram. I loved the look!
I didn't really have a base color. I painted one layer of Essie Mademoiselle to give it a very slight tint so that any lines or imperfections on my nail bed were evened out.
The flowers were painted using thinned out white polish. I added a slight pink tint to the centers to make it a little more interesting. The pink was a very thinned out Revlon Colorstay Card Shark. Then I ended with a bit of gold glitter, concentrating it in the center, but spreading it out a tiny bit.
I have my first client photo for you next! I had my first nail art client today; it was so exciting.
I hope you all have a fantastic week!
This was inspired by babynail_nagoya on Instagram. I loved the look!
I didn't really have a base color. I painted one layer of Essie Mademoiselle to give it a very slight tint so that any lines or imperfections on my nail bed were evened out.
The flowers were painted using thinned out white polish. I added a slight pink tint to the centers to make it a little more interesting. The pink was a very thinned out Revlon Colorstay Card Shark. Then I ended with a bit of gold glitter, concentrating it in the center, but spreading it out a tiny bit.
I have my first client photo for you next! I had my first nail art client today; it was so exciting.
I hope you all have a fantastic week!
Wednesday, April 13, 2016
Bird Locket
This week was inspired by a pretty vintage locket. I loved with white and red look. Having some quirky little bird helped too.
I changed it up a little and used a holo base, Girly Bits January Morning. Have I ever mentioned that I love this color? The red was OPI Got The Blues For Red.
I used my thinnest brush for this design - Born Pretty's striping brush - and my smallest dotter. Then I added some gold glitter dots using ?????
I hope you all have a wonderful week!
I changed it up a little and used a holo base, Girly Bits January Morning. Have I ever mentioned that I love this color? The red was OPI Got The Blues For Red.
I used my thinnest brush for this design - Born Pretty's striping brush - and my smallest dotter. Then I added some gold glitter dots using ?????
I hope you all have a wonderful week!
Tuesday, March 15, 2016
Diamond Glitter Placement
This one is a first for me. I've done a glitter placement before, but nothing like this one; this one has edges that actually had to match up. ...And my perfectionist side might have decided that this would be a great time to show itself. Of course.
I like the end result, but don't be too disappointed if I never do this again. :D
It kind of reminds me of a Jester, for some reason. I guess it's the diamonds, who knows!
My base polish was Liquid Sky Lacquer What Was Your Name Again. Then I used diamond shaped glitter to create the accent nail. In this case, the glitter was from Wildflowers Nail Academy. I watched a lot of Fixer Upper episodes while making this design!
I hope you all have a fantastic week!
I like the end result, but don't be too disappointed if I never do this again. :D
It kind of reminds me of a Jester, for some reason. I guess it's the diamonds, who knows!
My base polish was Liquid Sky Lacquer What Was Your Name Again. Then I used diamond shaped glitter to create the accent nail. In this case, the glitter was from Wildflowers Nail Academy. I watched a lot of Fixer Upper episodes while making this design!
I hope you all have a fantastic week!
Sunday, March 13, 2016
Review: Art Deco Studs
I have a new review for you all! I feel like it's been ages since I've done a review. This one is for some really neat Art Deco-esque studs from Born Pretty. You can find them here.
These are pretty large for my tiny fingers, but not too bad.
Pros: They are a beautiful color (that's always the most important, you know). The shape of the stud is such that it fits nicely on your nail; there is a tiny bit of a gap on the edges, but nothing that would cause a major problem with getting it caught on things. Another huge plus is that it is very re-usable. The color does not come off if you soak your finger in acetone to remove the stud, which is great!
Cons: The size is really the only con, and that's only if you have tiny nails.
Overall this is a really great product! It looks cute, and would work really as a stand alone or with an art deco design.
I finally bought some of the gorgeous ILNP polish. I've been eyeing them for a very long time, and I finally broke down and bought some early last month. I purchased Black Orchid and Juliette. The base for this design was Black Orchid. It's a beautiful holo that really sparkles in the sun.
Isn't it pretty?
Well, I'll leave you with that dazzling shade. I hope you all have a fantastic week!
These are pretty large for my tiny fingers, but not too bad.
Pros: They are a beautiful color (that's always the most important, you know). The shape of the stud is such that it fits nicely on your nail; there is a tiny bit of a gap on the edges, but nothing that would cause a major problem with getting it caught on things. Another huge plus is that it is very re-usable. The color does not come off if you soak your finger in acetone to remove the stud, which is great!
Cons: The size is really the only con, and that's only if you have tiny nails.
Overall this is a really great product! It looks cute, and would work really as a stand alone or with an art deco design.
I finally bought some of the gorgeous ILNP polish. I've been eyeing them for a very long time, and I finally broke down and bought some early last month. I purchased Black Orchid and Juliette. The base for this design was Black Orchid. It's a beautiful holo that really sparkles in the sun.
Isn't it pretty?
Well, I'll leave you with that dazzling shade. I hope you all have a fantastic week!
labels:
bling,
glitter,
holographic,
review,
rhinestones
Friday, March 11, 2016
Zoya Glitter Gradient
I''m almost caught up! Hooray!
While I was in Alabama, I bought myself some new polish (I just can't resist). It's not a new shade; cheap-o me bought it on clearance. :D I bought Zoya Pixie Dust Arlo. I love the pixie dust collection; it looks so pretty by itself, but it also is a great polish for layering.
This is a terrible picture (I didn't get a good one before it came peeled off), but you get the idea. I used Essie Bahama Mama as my base and -- for the glitter, of course.
I hope you all have a fantastic week!
While I was in Alabama, I bought myself some new polish (I just can't resist). It's not a new shade; cheap-o me bought it on clearance. :D I bought Zoya Pixie Dust Arlo. I love the pixie dust collection; it looks so pretty by itself, but it also is a great polish for layering.
This is a terrible picture (I didn't get a good one before it came peeled off), but you get the idea. I used Essie Bahama Mama as my base and -- for the glitter, of course.
I hope you all have a fantastic week!
Wednesday, March 9, 2016
Hearts
Happy super super late Valentine's Day! Ha!
When I was in high school, I was in color guard (marching band). I like to think that I had the best guard instructor. He was an excellent teacher, wrote excellent routines, squeezed in an occasional life lesson, and secretly liked us all, not matter how crazy we got. He also designed all of our show flags. And they were all so beautiful! (You can see some of them in an old DeviantArt post here.) This design was inspired by one of them (that took a while to get to the point!).
This isn't the best picture, but you get the idea.
I think Girly Bits Cosmetics January Morning is my new favorite base... It goes with everything, and it is subtly sparkly. To make the heart, I started by making a basic heart shape with red acrylic paint, and then refining it to the shape I wanted. Then I added the gold accent with gold acrylic paint. The outline and scroll work were made with black acrylic paint.
I hope you all have a fantastic day!
When I was in high school, I was in color guard (marching band). I like to think that I had the best guard instructor. He was an excellent teacher, wrote excellent routines, squeezed in an occasional life lesson, and secretly liked us all, not matter how crazy we got. He also designed all of our show flags. And they were all so beautiful! (You can see some of them in an old DeviantArt post here.) This design was inspired by one of them (that took a while to get to the point!).
This isn't the best picture, but you get the idea.
I think Girly Bits Cosmetics January Morning is my new favorite base... It goes with everything, and it is subtly sparkly. To make the heart, I started by making a basic heart shape with red acrylic paint, and then refining it to the shape I wanted. Then I added the gold accent with gold acrylic paint. The outline and scroll work were made with black acrylic paint.
I hope you all have a fantastic day!
labels:
acrylic,
glitter,
heart,
Holiday,
holographic,
Valentine's
Tuesday, March 8, 2016
Butterfly
I almost don't know where to start, it's been so long! As you might or might not know, I've been in Alabama the past two months helping my mom clean out her parents' house. On top of all that unexpected craziness, my computer died, meaning I couldn't blog. :( But, my computer was fixed two weeks ago, and I've finally made it home. Be prepared for a flood of posts!
I was thinking of Spring when I made this design. Even in Alabama, January was still a bit chilly and things hadn't greened up again yet.
You might recognize this design, I painted one very similar several months ago. As with that design, the base for this butterfly is Girly Bits Cosmetics January Morning.
To make the butterfly, I used my thinnest brush and black acrylic paint. Once I got a pattern I liked, I filled in the wings with Girly Bits Cosmetics Downtown Funk. The spots were made with gold acrylic paint.
That was pretty short and sweet, compared to my usual posts! After so many months though, there's only so much that you remember you wanted to say...
I hope you all have a fantastic week!
I was thinking of Spring when I made this design. Even in Alabama, January was still a bit chilly and things hadn't greened up again yet.
You might recognize this design, I painted one very similar several months ago. As with that design, the base for this butterfly is Girly Bits Cosmetics January Morning.
To make the butterfly, I used my thinnest brush and black acrylic paint. Once I got a pattern I liked, I filled in the wings with Girly Bits Cosmetics Downtown Funk. The spots were made with gold acrylic paint.
That was pretty short and sweet, compared to my usual posts! After so many months though, there's only so much that you remember you wanted to say...
I hope you all have a fantastic week!
Sunday, February 14, 2016
XOXO
I have a new set up in my shop! And I must say, I really love it. I
keep hoping I'll find time to paint it on my own nails this Valentine's
Day. (I haven't been posting much recently because I'm down south
helping my mom clean out her parents' house this month and last month.)
I started with a white base, and then added a layer of Girly Bits January Morning. I just love that polish!
I used a new black water-based paint that I bought from ?. I really like it so far; it's nice and thin, but not too thin. I used my favorite super thin brush from Born Pretty Store.
For the thumbs, I outlined the heart, and then placed red glitter inside of it.
This set is up in my shop, so check it out! I don't have time to deliver to you by this Valentine's Day, but you can always keep it in mind for the next! :)
You can find it here in my shop.
I hope you all have a fantastic week!
I started with a white base, and then added a layer of Girly Bits January Morning. I just love that polish!
I used a new black water-based paint that I bought from ?. I really like it so far; it's nice and thin, but not too thin. I used my favorite super thin brush from Born Pretty Store.
For the thumbs, I outlined the heart, and then placed red glitter inside of it.
This set is up in my shop, so check it out! I don't have time to deliver to you by this Valentine's Day, but you can always keep it in mind for the next! :)
You can find it here in my shop.
I hope you all have a fantastic week!
labels:
bling,
Etsy,
fake nails,
glitter,
spring,
Valentine's
Tuesday, January 19, 2016
Winter Glitter
So I bought this new glitter from Born Pretty. It is awesome! It is varying shades of iridescent glitter, and is so pretty! You can find it here on their website.
I think it's perfect for winter. Or whenever you want glitter. Whichever comes first! I started with a base of Girly Bits January Morning. I only painted two coats to leave it more sheer. Then I placed each glitter piece. (Which took forever! But it was worth it. It's so pretty!) I finished it of with a matte topcoat.
This is on my right hand, so I think I'm going to try and keep it as long as possible!
I hope you all have a fantastic week!
I think it's perfect for winter. Or whenever you want glitter. Whichever comes first! I started with a base of Girly Bits January Morning. I only painted two coats to leave it more sheer. Then I placed each glitter piece. (Which took forever! But it was worth it. It's so pretty!) I finished it of with a matte topcoat.
This is on my right hand, so I think I'm going to try and keep it as long as possible!
I hope you all have a fantastic week!
Tuesday, January 12, 2016
Snowmen
This week I have some cute snowmen with crazy hats for you all!
I love the accent. And the base color of the tiny snowmen. And the tiny snowmen. It's just so cute!
For the accent snowman, I started with a white base, and then added one layer of Girly Bits January Morning to give it a bit of snow shimmer. I used my dotter for the eyes, mouth, and carrot nose. His hat was made with my green nail art pen (which somehow turned teal-ish), and two shades of grey for the fur.
To make the tiny snowmen, I started with a base of January Morning (two coats to leave it sheer). Then I placed some really pretty iridescent glitter on top. I used my dotter to make the snowmen, and my tiny brish to make their hats and arms.
I finished them all off with a matte top coat.
I hope you all have a fantastic weekend!
I love the accent. And the base color of the tiny snowmen. And the tiny snowmen. It's just so cute!
For the accent snowman, I started with a white base, and then added one layer of Girly Bits January Morning to give it a bit of snow shimmer. I used my dotter for the eyes, mouth, and carrot nose. His hat was made with my green nail art pen (which somehow turned teal-ish), and two shades of grey for the fur.
To make the tiny snowmen, I started with a base of January Morning (two coats to leave it sheer). Then I placed some really pretty iridescent glitter on top. I used my dotter to make the snowmen, and my tiny brish to make their hats and arms.
I finished them all off with a matte top coat.
I hope you all have a fantastic weekend!
Friday, January 8, 2016
Sweaters
Last week I had this cute sweater design on my nails. I had tried this a few weeks before with gels, but I didn't know what I was doing and it looked awful. So this time I tried something different and got a much better result!
For the sweaters, I started with a base of Orly Matte FX Purple Velvet. To make the raised designs, I used Purple Velvet again. I put a drop of the polish on a plate and let it sit for a tiny bit to let it thicken up ever so slightly. Then I used my tiny brush and painted on the designs. I found I liked it better with two layers, to make the design a little more raised.
If I still had access to a UV/LED light (I don't own my own), I would have applied my matte gel top coat, and then painted on two-three layers of the design to give it a raised appearance. The first time I did, I painted it in reverse order, so it all ended up blending together and looking like I couln't paint a solid color.
On my index and pinky fingers, I used Noodles Nails Berries and Cream. I love this color for winter! And I love it even better with a matte top coat.
I hope you all have a fantastic week!
For the sweaters, I started with a base of Orly Matte FX Purple Velvet. To make the raised designs, I used Purple Velvet again. I put a drop of the polish on a plate and let it sit for a tiny bit to let it thicken up ever so slightly. Then I used my tiny brush and painted on the designs. I found I liked it better with two layers, to make the design a little more raised.
If I still had access to a UV/LED light (I don't own my own), I would have applied my matte gel top coat, and then painted on two-three layers of the design to give it a raised appearance. The first time I did, I painted it in reverse order, so it all ended up blending together and looking like I couln't paint a solid color.
On my index and pinky fingers, I used Noodles Nails Berries and Cream. I love this color for winter! And I love it even better with a matte top coat.
I hope you all have a fantastic week!
Thursday, December 24, 2015
Merry Christmas!
Merry Christmas Eve!
This year, as usual, I couldn't pick just one thing to paint. So I made a Christmas collage, Cotton Coney style.
I started with a base of Girly Bits Cosmetics January Morning. Then I added on stockings, candy canes, presents, and a tree.
To make the tree, I used some striping tape to mark off the space for the tree. (I used a great tape dispenser that I'll have to tell you all about soon...) The green I used was Finger Paints Sketch N Etch, and I added a very thin layer of Zoya Pixie Dust Vega over top to give it some sparkle. I topped the tree off (literally, ha!) with a tiny gold stud.
The candy canes, stockings, and presents were all made with either my red striper or Revlon Parfumerie Balsam Fir. The white stripes and stocking tops were made with my white striper, and the gold ribbon on the presents was some polish I got as a gift (Love brand, with no color name).
I also added some tiny iridescent hexagon glitters in the empty spaces ...so it didn't look so empty. And to make it glittery. (Man, I am excelling at writing today....) Then I topped it off with a matte coat!
I hope you all have a good time this Christmas, but I know it's not always as fun for some as it is for others. :/
Merry Christmas!
This year, as usual, I couldn't pick just one thing to paint. So I made a Christmas collage, Cotton Coney style.
I started with a base of Girly Bits Cosmetics January Morning. Then I added on stockings, candy canes, presents, and a tree.
To make the tree, I used some striping tape to mark off the space for the tree. (I used a great tape dispenser that I'll have to tell you all about soon...) The green I used was Finger Paints Sketch N Etch, and I added a very thin layer of Zoya Pixie Dust Vega over top to give it some sparkle. I topped the tree off (literally, ha!) with a tiny gold stud.
The candy canes, stockings, and presents were all made with either my red striper or Revlon Parfumerie Balsam Fir. The white stripes and stocking tops were made with my white striper, and the gold ribbon on the presents was some polish I got as a gift (Love brand, with no color name).
I also added some tiny iridescent hexagon glitters in the empty spaces ...so it didn't look so empty. And to make it glittery. (Man, I am excelling at writing today....) Then I topped it off with a matte coat!
I hope you all have a good time this Christmas, but I know it's not always as fun for some as it is for others. :/
Merry Christmas!
Wednesday, December 23, 2015
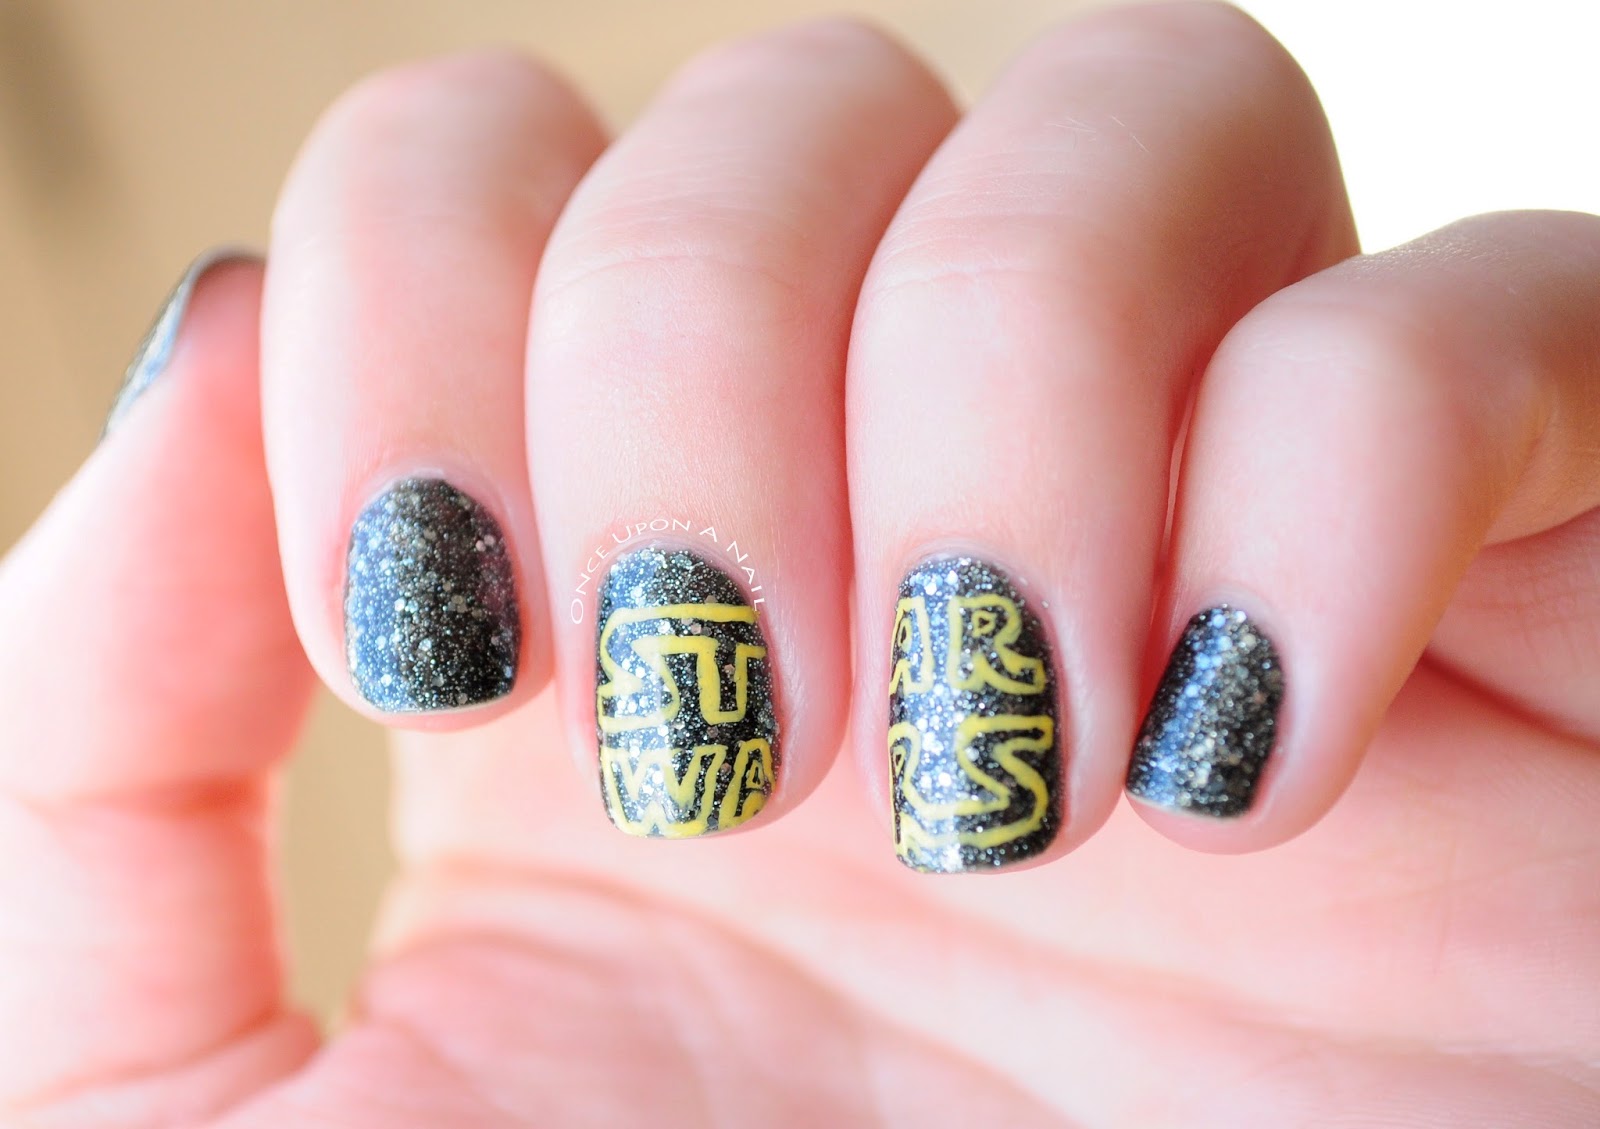
Star Wars!
Those of you that follow my Instagram saw my sneak peak a few days ago. I saw The Force Awakens on opening day!! It was really good. They definitely knew that you knew that there is another movie coming, so they didn't care about giant cliff hangers, but it was good!
Anyway, you know know some Star Wars nails had to be made for the night.
I started with a base of Nina Ultra Pro Glamrock. It is one of my favorites bases for anything star related.
To make the letters, I used Revlon Gel Envy Casino Lights and my favorite teeny tiny brush from Born Pretty.
I hope you all have a wonderful Christmas!
(And if you didn't see Star Wars... go see it!)
Anyway, you know know some Star Wars nails had to be made for the night.
I started with a base of Nina Ultra Pro Glamrock. It is one of my favorites bases for anything star related.
To make the letters, I used Revlon Gel Envy Casino Lights and my favorite teeny tiny brush from Born Pretty.
I hope you all have a wonderful Christmas!
(And if you didn't see Star Wars... go see it!)
Wednesday, December 16, 2015
Christmas Ornaments
I'm so excited that it's December and I can officially start Christmas and winter designs. Especially since I have a beautiful new holo from Girly Bits Cosmetics, called January Morning. It is the perfect winter polish!
I've been wanting to paint some ornaments for a while. I based these of old retro ornaments.
I made the ornaments with black and red acrylic paint, and a green polish pen.
I hope you all have a fantastic week!
I've been wanting to paint some ornaments for a while. I based these of old retro ornaments.
I made the ornaments with black and red acrylic paint, and a green polish pen.
I hope you all have a fantastic week!
Saturday, December 12, 2015
Butterfly Wings
I am in love with this set!
I've never painted butterfly wings before, but I have always wanted to try. A friend at school and I have been trying to get her nails painted for months, and we finally fit it in on her last day.
Isn't it so pretty and sparkly?! I used all holos for this design. We couldn't resist their shiny-ness! And they were all Girly Bits Cosmetics polishes... I guess she could be a walking ad for them. :)
I used Downtown Funk for the wings. January Morning is the pretty white holo behind the half butterfly. Well Isn't That Special is the purple in the wings of the half butterfly.
For the outlines and dots I used black and white acrylic paints and my favorite super tin brush.
I just can't stop looking at this one! Partly because I like how the design turned out, but also because of the sparkle....
Anyway, I sculpted these out (they are acrylic nails, which I don't think I mentioned). Looking at the pictures, I'd love to go back and reshape a couple; some of them look a little fatter than the others. But it's not too bad. Picky Sarah strikes again!
Well, that was a super distracted post. If you can get past all the "I love holos" it might be an intelligible post!
I hope you all have a fantastic week!
I've never painted butterfly wings before, but I have always wanted to try. A friend at school and I have been trying to get her nails painted for months, and we finally fit it in on her last day.
Isn't it so pretty and sparkly?! I used all holos for this design. We couldn't resist their shiny-ness! And they were all Girly Bits Cosmetics polishes... I guess she could be a walking ad for them. :)
I used Downtown Funk for the wings. January Morning is the pretty white holo behind the half butterfly. Well Isn't That Special is the purple in the wings of the half butterfly.
For the outlines and dots I used black and white acrylic paints and my favorite super tin brush.
I just can't stop looking at this one! Partly because I like how the design turned out, but also because of the sparkle....
Anyway, I sculpted these out (they are acrylic nails, which I don't think I mentioned). Looking at the pictures, I'd love to go back and reshape a couple; some of them look a little fatter than the others. But it's not too bad. Picky Sarah strikes again!
Well, that was a super distracted post. If you can get past all the "I love holos" it might be an intelligible post!
I hope you all have a fantastic week!
labels:
acrylic,
animals,
dots,
fake nails,
glitter,
holographic,
nature
Subscribe to:
Posts (Atom)