Showing posts with label movies. Show all posts

Tuesday, January 5, 2016

New Sets!

   I have some new sets available in my shop! I've taken way too long to put something new up. I've had several fall and Christmas sets ready for a while, but I just got busy and forgot about them. So they'll just go up next season instead!


   This first set is one I've been wanting to remake for months. I didn't like my first version of Pocahontas nails, but it was the best I could come up with at the time. This version has 1 similar nail, her turquoise necklace. The others are new. Her tattoo on her arm is the other accent nail, and the other three are based off the Colors of the Wind song.
   You can find it here in my shop.


   My Sleeping Beauty inspired set has been a long time coming. When I made the Disney Princess sets, I never could get the design right. Six months later, I finally got it! And, yes, you can get it in pink.
   You can find the set here in my shop.


   This is my first new Valentine's set! I have plans for another one that will be neat... 
   You can find this one here in my shop.

Wednesday, December 23, 2015

Star Wars!

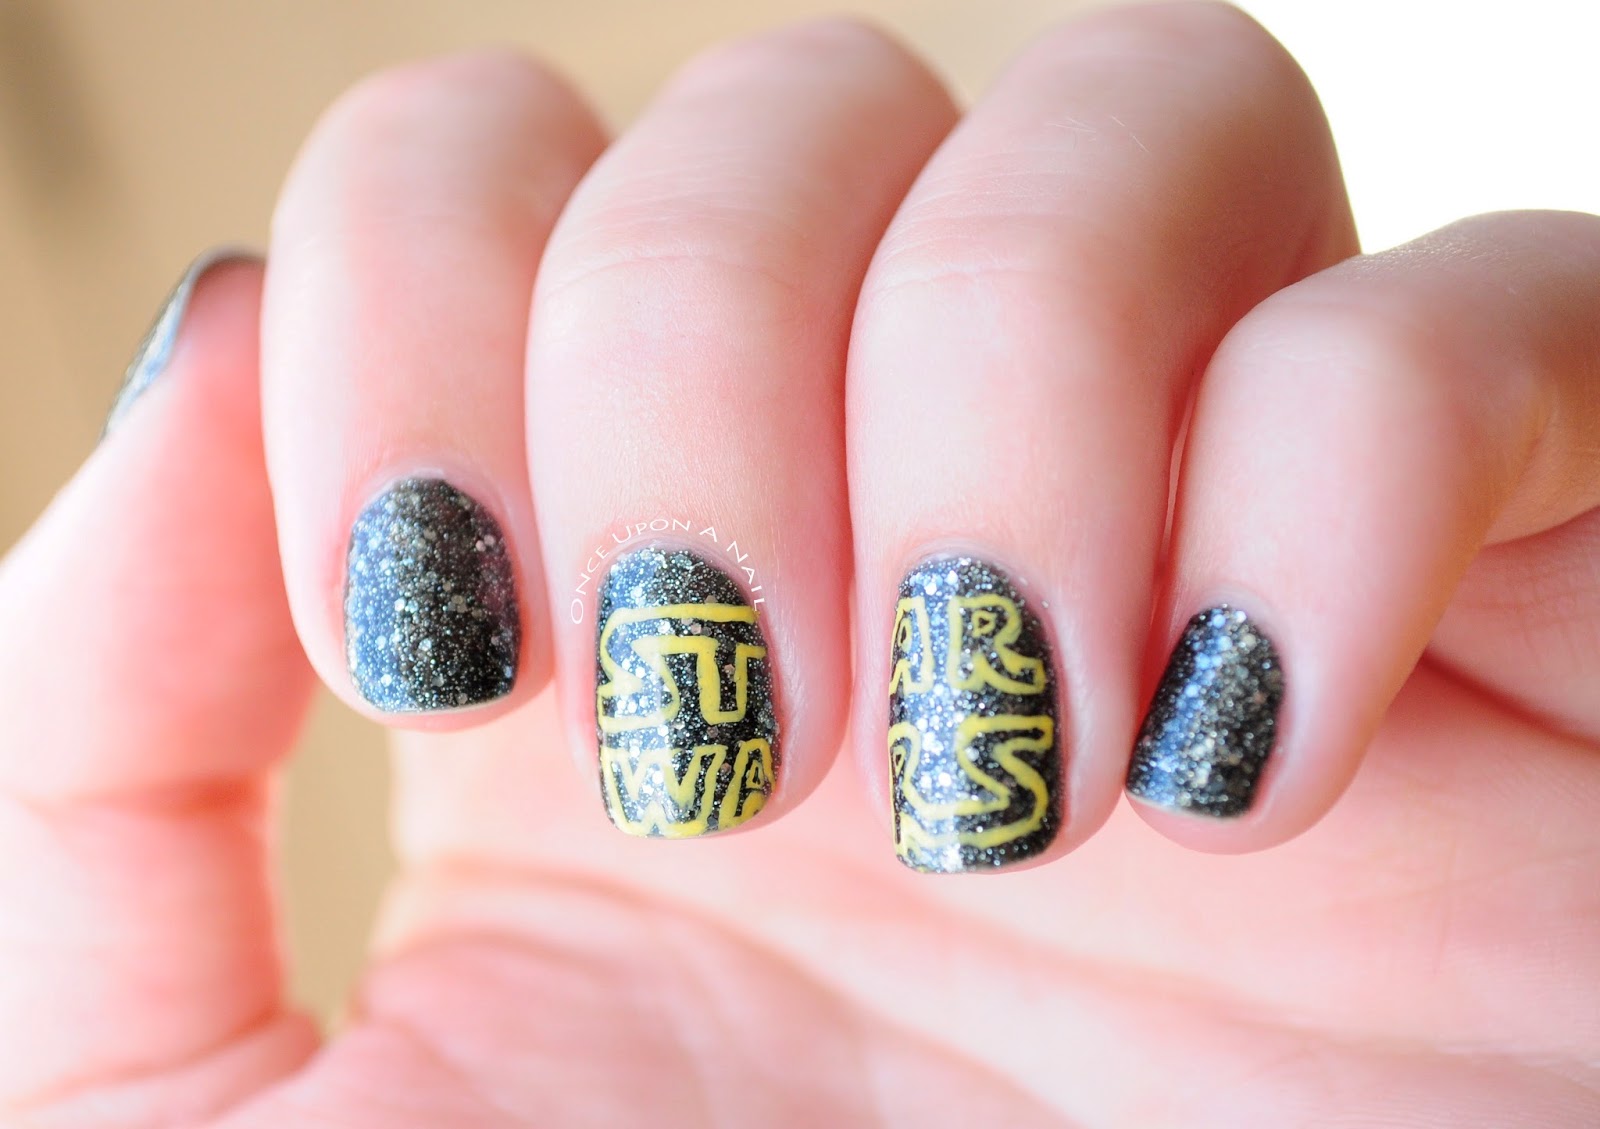
   Those of you that follow my Instagram saw my sneak peak a few days ago. I saw The Force Awakens on opening day!! It was really good. They definitely knew that you knew that there is another movie coming, so they didn't care about giant cliff hangers, but it was good!


  Anyway, you know know some Star Wars nails had to be made for the night.


   I started with a base of Nina Ultra Pro Glamrock. It is one of my favorites bases for anything star related.


   To make the letters, I used Revlon Gel Envy Casino Lights and my favorite teeny tiny brush from Born Pretty.

   I hope you all have a wonderful Christmas!
   (And if you didn't see Star Wars... go see it!)

Thursday, November 5, 2015

Halloween Part III

   The final installment! These are manikin hands and nail wheels.


   I made a werewolf! Isn't it cool?? There are a couple things I would fix (aren't there always?), but overall I'm satisfied.
   I used my manikin hand to make this one. I applied various shades of brown to the skin to darken it up (it was a very pale hand, completely wrong for a werewolf). I used hair from some curly hair extensions to make the furry hands.
   The nails were made with a cream base and a white crackle layer over top. I thought that gave it a nice bone-like texture. Then I sponged on various shades of brown and a bit of black at the base of the nails and the surrounding skin. One of the girls at school had some fake blood, so to complete the effect, I gave it some bloody nails.


   This is my Halloween-themed nail wheel. Some of them glow in the dark! I wish I had a picture for you... I'll need to bring it home, take one, and update this soon. The cemetery has ghosts that show up in the dark. The glowing forest glows in the dark, as well as the green part of the Evil Queen's poison apple. Oh, and the skull/ghoul faces!
   I think the Snoopys are my favorites though. I've always liked Charlie Brown so I had to try and paint some characters. They'll probably be back for Christmas too....

  That's all of my Halloween designs this year.

   Have a great weekend!

Tuesday, November 3, 2015

Halloween Part II

   To continue with my belated Halloween designs... (Eventually I will post them on Halloween if not before!)

   Here are a few designs I created at school on fellow students and clients.


   First up: Saw-themed nails. This student was dressing up as Jigsaw for Halloween, complete with the tricycle. I've never seen any of the Saw movies (I like to sleep at night), so I had to do a little research for this one.
  For the accent nails, I used Revlon Colortsay Sure Thing as my base, and red acrylic paint for the hand print and swirl. The other nails were painted with OPI Midnight in Moscow, a neat seemingly black base with a red shimmer when it's in the light.


   Sugar skulls and spider webs! This girl was dressing in a skeleton/sugar skull/Day of the Dead themed costume. To make this set, I started with a white base for the sugar skulls. Then I used a combination of red and black acrylic paint, as well as a green nail art pen. The webs were made with OPI Midnight in Moscow and white acrylic paint. The set was topped off with a matte topcoat.


   I'm a little bit proud of this one... I've always loved calligraphy, so it was really fun to combine my love of letters and my love of polish for this design! I'm not sure what the costume idea was for this one, but I'm just happy I got to paint pretty letters.
   I started with a black base, and then used acrylic paint for the letters. It was topped off with a matte topcoat as well. She had broken a couple of nails, so I sculpted those out. All in all, I think it took about 3 hours, including a quick smoke break for her and a wiggle break for me. :)

   I have one more installment and then I'm done with Halloween and back to trying to catch up.. I think I'm only 1 week behind. Surely I can catch up from that! :D

   Have a fantastic week!

Sunday, November 1, 2015

Happy [Belated] Halloween!

  Still behind... Nothing new!

   I hope you all had a great Halloween! We dressed up at school and had kids come in to trick or treat, it was lots of fun!


   I was Dorothy! I'm all about being cheap and using stuff I already have. I had recently bought this dress online and it worked perfectly!

   And of course, I had nails to match.


   I started with a white base, Revlon Colorstay Sure Thing. To make the blue plaid nails, I used some thinned out Sally Hansen Xtreme Wear Blue Me Away. I made the darker shadowed squares with Revlon Colorstay Indigo Night.


   To paint the poppies, I started with a bit of red, Revlon Colorstay Red Carpet. I used some thinned out OPI Midnight in Moscow to create the darker interior on the poppy petals, and then finished the flower out with some small dots of Revlon Colortay Buttercup.
   The stems and leaves were made with Studio M On the Field.


   And, despite not being able to find cheap red glitter shoes ANYWHERE (they are always in abundance at Walmart the years I don't need them...), I did put red glitter on my right hand. My feet just had to make do with plain, boring, un-glittery, red heels. :)


   I painted some other Halloween-themed desgins, I'll try to get them up soon. I might just have to go out of order for a week so my Halloween designs are posted at least near Halloween...  I really need to get my blogging life together!


   I hope you all have a fantastic week!

Tuesday, October 13, 2015

Halloween in... Disney World!

  ...Unfortunately, I'm not the lucky lady who gets to go. Somehow, my parents have neglected to ever take me there... Which I might or might not be slightly upset about. But hey, it's not like I didn't get to go to lots of other really cool places most people don't get to visit. So I guess it evens out.
   Anyways, I had a customer contact me about creating a couple custom sets for her trip to Disney World around Halloween. Super cool, right? It's got to be so much fun to go there on any holiday, but especially Halloween.


  The first set was a Hocus Pocus themed set. I've never really been a huge fan of that movie (I know, blasphemy!), but it was still really fun to create. She wanted four accents; the black flame candle, Thackery Binx (in cat form), the spell book, and Billy Butcherson.


   To keep it short, the main colors I used were purple with a glitter top coat (OPI I Vant to Bite Your Neck and Finger Paints Glitter Top Coat), green (L'Oreal New Money), and a really neat black with a slight red shimmer (OPI Midnight in Moscow).


   The other set she requested was a Mickey Mouse inspired set. For the thumbs, I used a base of CND Vinylux Grommet and my red striper. The black glitter is Nina Ultra Pro Glam Rock. The red glitter is Wet 'N Wild Fergie No Place Like Home (and one of my favorites!).


   I hope you all have a fantastic week!

Wednesday, June 17, 2015

Tangled

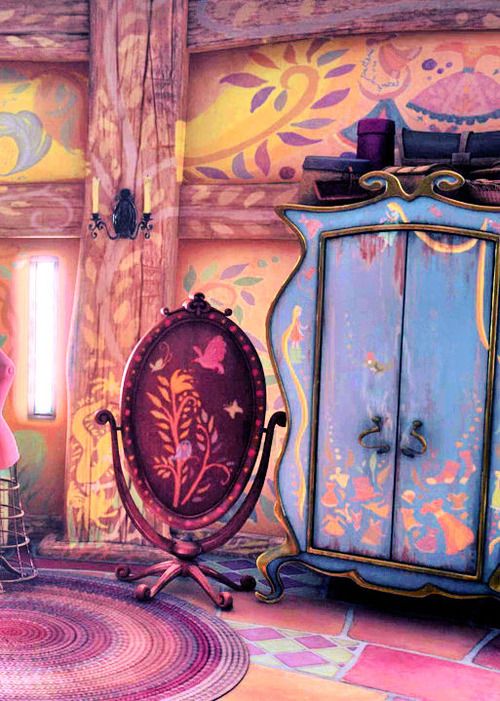
   I absolutely love the movie Tangled! It's definitely my favorite "official" Disney Princess movie. (Enchanted is my all time favorite, but Giselle isn't an official princess. Especially since she didn't actually end up marrying the prince....) I love her murals on the tower wall, so I wanted to come back and try to paint them. Here's some of my inspiration:


   I never painted her sun on either of my other sets, so I started with that knowing I wanted to fit it in, if only so people would know that this is a Rapunzel design. :)


   I started with a base of China Glaze White Ice. I've used up almost all of Orly Pink Nude, so this is my replacement!
   To make the sun, I started by painting the middle and then the flames with Revlon Colorstay Buttersup, using a dotter and small brush. Then using a really thin brush and some very thinned out OPI I Vant To Bite Your Neck, I outlined the sun and then painted in the background, leaving it a little streaky. (FYI, an effect that looks cool on your left hand does not look so great on your right...)


   Forgive me if I don't go into detail with the rest of the nails... Suffice to say that I used small, thin brushes and various shades of purples and browns, with a little bit of blue-green. My pointer is based off the first picture in my post, the one with the fish. My ring finger is based off the design on her mirror in the second picture.


   My thumb was based off some of the pretty birds that were scattered throughout the tower. I loved the curlicue head feathers on the short bird, so I had to paint him.

   I was going to show you my left hand, but as I mentioned earlier, the streaked purple design looked terrible on my left hand....

   I'm heading to my best friend's wedding tomorrow, so I might be silent for a few days...
   I hope you all have a great week!

Thursday, March 12, 2015

Alice In Wonderland

  Last week, I showed you guys one of the polishes I bought from Spellbound Nails, Watermelon Seeds. This week I have the second one, Eat Me, to show you all. It's part of her Alice In Wonderland collection, so of course I had to paint an Alice in Wonderland themed design.


   I forgot to take a shot of the polish before I painted on it, but you can more or less figure it out. It's a cream polish with multicolored glitter. It kind of reminded me of the caterpillar and his colorful smoke from Disney's animated version. Using Nina Ultra Pro Plum Perspective, I wrote "who are you," trying to mimic the wispy-ness of his smokey letters.


   On my left hand I made an "eat me" tag using a white and black striper, as well a small brush for the letters. It looked a little lonely, so I added a teacup to go with the whole food theme. It's kind of hard to see though. I used Sally Hansen Complete Salon Manicure Barracuda for the blue, and a white striper for the white. A tiny bit of Maybelline Color Show Neutral Statement worked well for the tea.


   I hope you all have a fantastic week!

Saturday, March 7, 2015

Cinderella Re-do

   In honor of Disney's new Cinderella movie coming out this month (next week!!), I revamped my old Cinderella set two weeks ago.


   It's a lot like the previous design, the only difference is the carriage. As in the old design, the light blue nails are based off her dress. I started with a base of Sally Hansen Complete Salon Manicure Barracuda. I used Nina Ultra Pro French White for the "poufs" on her skirt.


   For her carriage, this time I started with a completely different background. I started with a base of Sally Hansen Complete Salon Manicure Jungle Gem and then painted a coat of Maybelline Color Show Crystal Statement to give it the shiny-sparkley finish. To make the carriage, I started with my cream striper to make the pumpkin shape. Next I painted on the wheels with Sally Hansen Complete Salon Manicure Buttercup using a thin brush. I used Buttercup for the door outline and the pumpkin stem as well. For the curtains in the door window I used a red striper. Lastly, I added the white stars with some white acrylic paint and the tip of a small brush.


   You can find the set here in my shop, as well as the old version. They're in the same listing, you just choose an option.

   I hope you all have a great week!

Monday, November 24, 2014

Thanksgiving!

   Despite being way ahead of seasons this year, I am super excited for Thanksgiving! I love all the food, and of course seeing my family. I don't get to see my cousins enough. My roommate and some friends had our own small Thanksgiving this past Saturday and it was lots of fun! We didn't burn the turkey or anything, so we were happy. I don't think any of us ate any supper that night, we ate too much at lunch!

   Anyway, back to nails. I of course had to paint some Thanksgiving-themed nails for this week, in honor of the holiday. I found the perfect inspiration on Pinterest!


   Aren't they so cute?! I found them a couple weeks ago and knew I had to paint them!


   I started with two different bases; the Indians/turkeys have an Orly French Manicure Pink Nude base, and the Pilgrims have an Orly FX Starburst base (although you can't really tell...). I thought the glitter in Starburst would be really cute, but the minions are too big! Oh well, you see it on my right hand -


   To make the minions, I started with Sally Hansen Xtreme Wear Mellow Yellow.
   For the Indians/turkeys, I painted the turkey feathers next, using Sally Hansen Complete Salon Manicure Butterscotch, Sally Hansen Xtreme Wear Sun Kissed, L'Oreal He Read My Mind, and Sally Hansen Complete Salon Manicure Branch Out.
   For the Pilgrims, after painting Mellow Yellow, I painted the hat next, using OPI A-Piers to Be Tan. To make the buckle I painted a yellow square (over top white, to make the yellow pop), and then used my black striper.


   Next I painted their faces, starting with China Glaze Pelican Grey for the goggles, then white and black for the eyes and mouth. To make the teeth I used the tip of my smallest brush. It works really great if you leave a bit of the previous polish on and let it dry so it makes a firm point (you can clean it off later). I used OPI A-Piers to Be Tan for their shirts and black for the buttons. Then I topped it all off with a matte top coat!

   After tomorrow at 12pm, I am done with class and officially on Thanksgiving break! I'm so excited! I won't have any new posts until I get back, I don't want to mess with carting polishes home this week. Besides, when I'm not at work, I'll be to busy visiting with my family!

   Have a wonderful week and a great Thanksgiving to those of you celebrating!

Thursday, September 11, 2014

Disney Princess Challenge #12: Snow White


   This week is Snow White! My design isn’t much different from most of the Snow White designs. I couldn’t think of any design that looked any better than those already out there, so I just combined the ones that I thought were best.


   For the accent I painted her red headband. I started with a base of Sally Hansen Xtreme Wear Black Out to look like her hair. For the bow I used my red Stripe Rite striper because it shows up really well on top of anything and doesn’t really need a white layer underneath to it make it pop.


   For the rest of my fingers I combined her sleeves with her yellow skirt. I started with a yellow base, Revlon Colorstay Buttercup. I really like the lightness of this yellow, I think it’s so pretty! For Snow White’s sleeves I started with a blue base of Revlon Colorstay Indigo Night. Then I used my red Stripe Rite striper for the slits and the sleeve hem.


   I have this set available in my Etsy shop! You can find it here.

   Next post is on to non-Disney designs! I really liked painting the Princesses, but I'm ready for something new. I have some other Disney characters I want to paint – Alice (Alice in Wonderland), Giselle (Enchanted), and a few others – but I’ve come across some other designs I really want to paint as well. So eventually I'll get back to Disney, but for now it's on to something new!

   I hope you all have a fantastic week!

Wednesday, July 30, 2014

Disnrey Princess Challenge #8: Jasmine

    Once again, I've fallen behind... But like I said in my last post, I probably won't be consistent again for several more weeks, so bear with me!
    This is last week's design, but only by a little; I just repainted my nails yesterday. Jasmine was next in line! While scrolling through Pinterest when I first started "researching" for this challenge (I have to have it all planned out in advance, you know), nearly everyone had the same thing for Jasmine - some variation of her headband/tiara/jeweled-thing and tiger stripes. Which is great and all, but I wanted to do something different. Then I realized that there's not much to draw from with her costume. After digging a bit more I remembered a lady over in deviantArt who made historically accurate Disney princesses. I really liked the bodice design on Jasmine so I made that into my 'different' element.


    Fittingly enough, I dived into a "whole new world" of nail art - 3D nails. For the headdress I used some little sparkly gems. I couldn't find a blue that I liked that was small enough, so I deviated from Disney's design and made it silver instead.


   I used 3mm gems and attached them with nail glue. I also put a topcoat over top it all just to add another layer of protection. My mom and I were running a bet to see how long the gems would last. Neither of us were very optimistic and thought a day, maybe two. I did lose one on the second day, but all the others stayed on for four days! They probably would have stayed on longer except that I had a fidgety spell and picked them all off one night. Oops.


   My base color for the majority of my nails was a new color and a new brand I had never seen before - Studio M Blue Ming. I don't know how the rest of the brand is, but I was very pleased with this color. It wasn't too thin, I only needed two coats. I'd buy more of the brand, except that they have pretty much only super bright colors. Which is great if you're into that, but I'm not.


   The gold band was made with Maybelline Color Show Bold Gold. On my thumb, the darker teal vines were made with a thinned out Flower Good Bud-dy. I made the flowers with a thinned out Finger Paints Paper Mache.


   For Rajah's tiger stripes I used a base of Sally Hansen Xtreme Wear Sun Kissed. After studying several different tiger stripe designs and giving myself a good pep talk, I made the stripes with my black Stripe Rote striper. I know animal stripes and patterns are super in and done by so many people, but they just make me nervous! I know it's silly, and this wasn't too hard, but they just always seem so difficult to me!
   So I ended up crossing two new milestones with this design - 3D nails and animal prints!


   As usual, this is available in my shop! You can find it here. No options for this design, although I loved the vine nail so much that I made it into its own set! you can find that set here.


   As I said in the beginning of this post, I've already painted my nails again. Belle is next! She's my favorite princess, so I was super excited for this one to come around. I really, really like how it turned out and can't wait to show you guys! I think she is my favorite design so far.

   I hope you all have a fantastic week!

Friday, July 11, 2014

Disney Princess Challenge #6: Tiana

    First off, I know I've been super inactive the past few weeks. I've had tons of stuff to show you all, but I just haven't found the time to blog! :( While I'd love to blame it all on work, that's not completely fair. My work schedule has picked up again (hooray for more money!), so I haven't had as much free time and what little I do have is often spent cramming in Etsy orders. But it hasn't been all work, work, work. I just haven't made the time to blog like I had been doing. I'm hoping to become more regular again, but I might not until September.
    Speaking of September.... I am going to be taking part in a street festival! I'm going to have a booth and see how selling my fake nails works out. I'm super excited, but also a little nervous. I've never done anything like this, nor have I heard of nail people selling fake sets, only actually painting nails. It'll be a giant experiment. I'll have some more details soon.

   And on to nails. This is actually last week's design, but who's counting! Last week was Tiana from The Princess and the Frog. I based this one off of her green gown. I call it her transformation gown, this one -


   I based my design off of the "petals" on her skirt and the lily around her waist.


   I didn't really have the right colors at the time that I painted this on my fingers, so I did a lot of mixing. I added a ton of white to L'Oreal New Money and brushed it on for the base. Let me tell you, using a smallish brush to paint your whole nail is more than a little annoying. So greatful I don't have to do that all the time!


   To make the petals I mixed a fair amount of white to Revlon Parfumerie Balsam Fir. Then I outlined them with my white striper. I tried to not make it an exact outline, but I found out I'm not too great at that. Oh well.  I also painted a light glitter coat on top of the dark green mix.


   The lily is by far my favorite aspect of both her dress (except for maybe the petaled part on the bodice) and my design. I used my white striper to make the lily. Revlon Parfumerie Balsam Fir was used for the leaves. I thinned it out a bit to make the curly vines.  I used Revlon Colorstay Buttercup to put little yellow dots in the middle of the lily.


   As with the others, this is available in my Etsy shop! ...And, not surprisingly, I have many options. You can buy the original full dress design (petaled fingers and lily accent), as well as solid light green with accent or solid dark green with accent. Just in case you wanted something super simple. Or whatever.
   You can find the set(s) here in my shop!

   I have a couple more sets to show you all, but for now I'm done. It's late and I'm sleepy! (And I'm almost done with my book! And I have to finish it tonight, you know...) Hopefully I'll at least get in this week's Princess (Mulan) before I paint the new Princess (Jasmine)! I don't want to always be a week behind...

   At any rate, I hope you all have a fantastic weekend! My friend and I are going to hang out tomorrow, so that'll be a bunch of fun. I'm super excited!