Tuesday, May 27, 2014

Flowers

   This week I revolted and didn't paint an Etsy set on my fingers! I am so ready to be done with this project. My to-paint pile was huge before I started, and now it's getting a little ridiculous. And I know, deviating from Etsy-to-Fingers just prolongs it, but I needed a break.
   I've had my eye on this design for several months. It's so pretty!


   It's inspired by this design from Wondrously Polished. If you haven't seen her work before, you should definitely go check her out! She paints some amazing designs.


   This was super easy to make. I painted a base of Sally Hansen Xtreme Wear Mellow Yellow. Then I dotted on the flowers. I used a thicker brush and just dotted it on there until I had a shape I liked; not too round, but not too jagged. Then I painted the black, in pretty much the same way. Then I sealed it all with a top coat!


   This will be my last post for a while. I'm going on vacation tomorrow and won't have access to my polishes. My shop's on hold and everything. I'm so excited for my break! 

   I hope you all have a wonderful week!

Sunday, May 25, 2014

Faux Watercolor

   I have a new design on my toes, and this one is share-worthy (unlike my last one!). I was inspired by a tutorial from The Nailasaurus. It was super easy, and turned out a lot nicer than I thought! Now I can do two types of gradients! Sponged gradients are still a mystery to me though...


   It reminds me of the ocean. Its really made me want to go to the beach! I haven't been in ages and I miss it. After going at least once a year (if not more) during your childhood, you really miss it after not being able to go for almost three years.


   This was so easy to make! I thought I would need my polish thinner, but you really don't need it. It made it easier to use one slightly goopy polish, but this is definitely something anybody could do, as long as you have a smallish brush. I used the largest of my small brushes:


   It's the size 0 of my three Wistonia brushes.
   I only used three shades for this instead of 4 like in the tutorial. I didn't have three blues that went together well enough. I don't think you can really tell though.
   I also made this into an Etsy set! I have three colors available - blue, pink, and purple. I think the blue is still my favorite though, followed by purple, probably. I did have four colors for the pink and purple, so they're more like the tutorial in that sense.


   I don't have a link yet though, I'm going to be on vacation for a week so my shop is on hold - no one can purchase anything at the moment. So it would be silly to post a new listing when no one can see it! When I get back I'll post a picture of the full set and a link to the listing.

   I'll see you all in a week! Maybe sooner, who knows! I plan on painting my nails before the trip, but I'm not sure I'll have time. This is a hectic week!
   Have a wonderful week guys!

Thursday, May 22, 2014

Butterflies

   This week's edition of Etsy-to-Fingers is another old set from the beginnings of my nail shop. I never really liked the original set, but this newer version I like better.
   I can never decide if this design is a butterfly or a flower, so I just call it the butterfly flower! What do you guys think it is more like?


   I had plans to make a tutorial for this design, but I got carried away in the painting and only got as far as step three. Oops. Maybe I'll get a tutorial finished eventually. We'll see how that goes!


   I used my favorite base, Revlon Colorstay Pale Cashmere. To make the wings/petals I outlined the basic shape with my black Stripe Rite striper. Then I filled it in with Sally Hansen Xtreme Wear Mellow Yellow, and sponged Nina Ultra Pro Tangerine about halfway up. Then I went over the black outline again and made the bottom of each petal a little thicker than the top line, and filled in the top corner (all with my striper). Next I added white dots , and then sealed everything with my top coat, Seche Vite.


   You can find the listing here in my Etsy.
   I know last week I promised a new design on my toes, but I don't really like how it turned out. Hopefully I'll have time to redo them next week. I might not though; I'm going on vacation starting Wednesday! That only leaves me until Tuesday to paint, and I'm working a lot this weekend... I'll at least have a new finger nail design next week!

   I hope you all have a wonderful week!

Friday, May 16, 2014

Strawberries

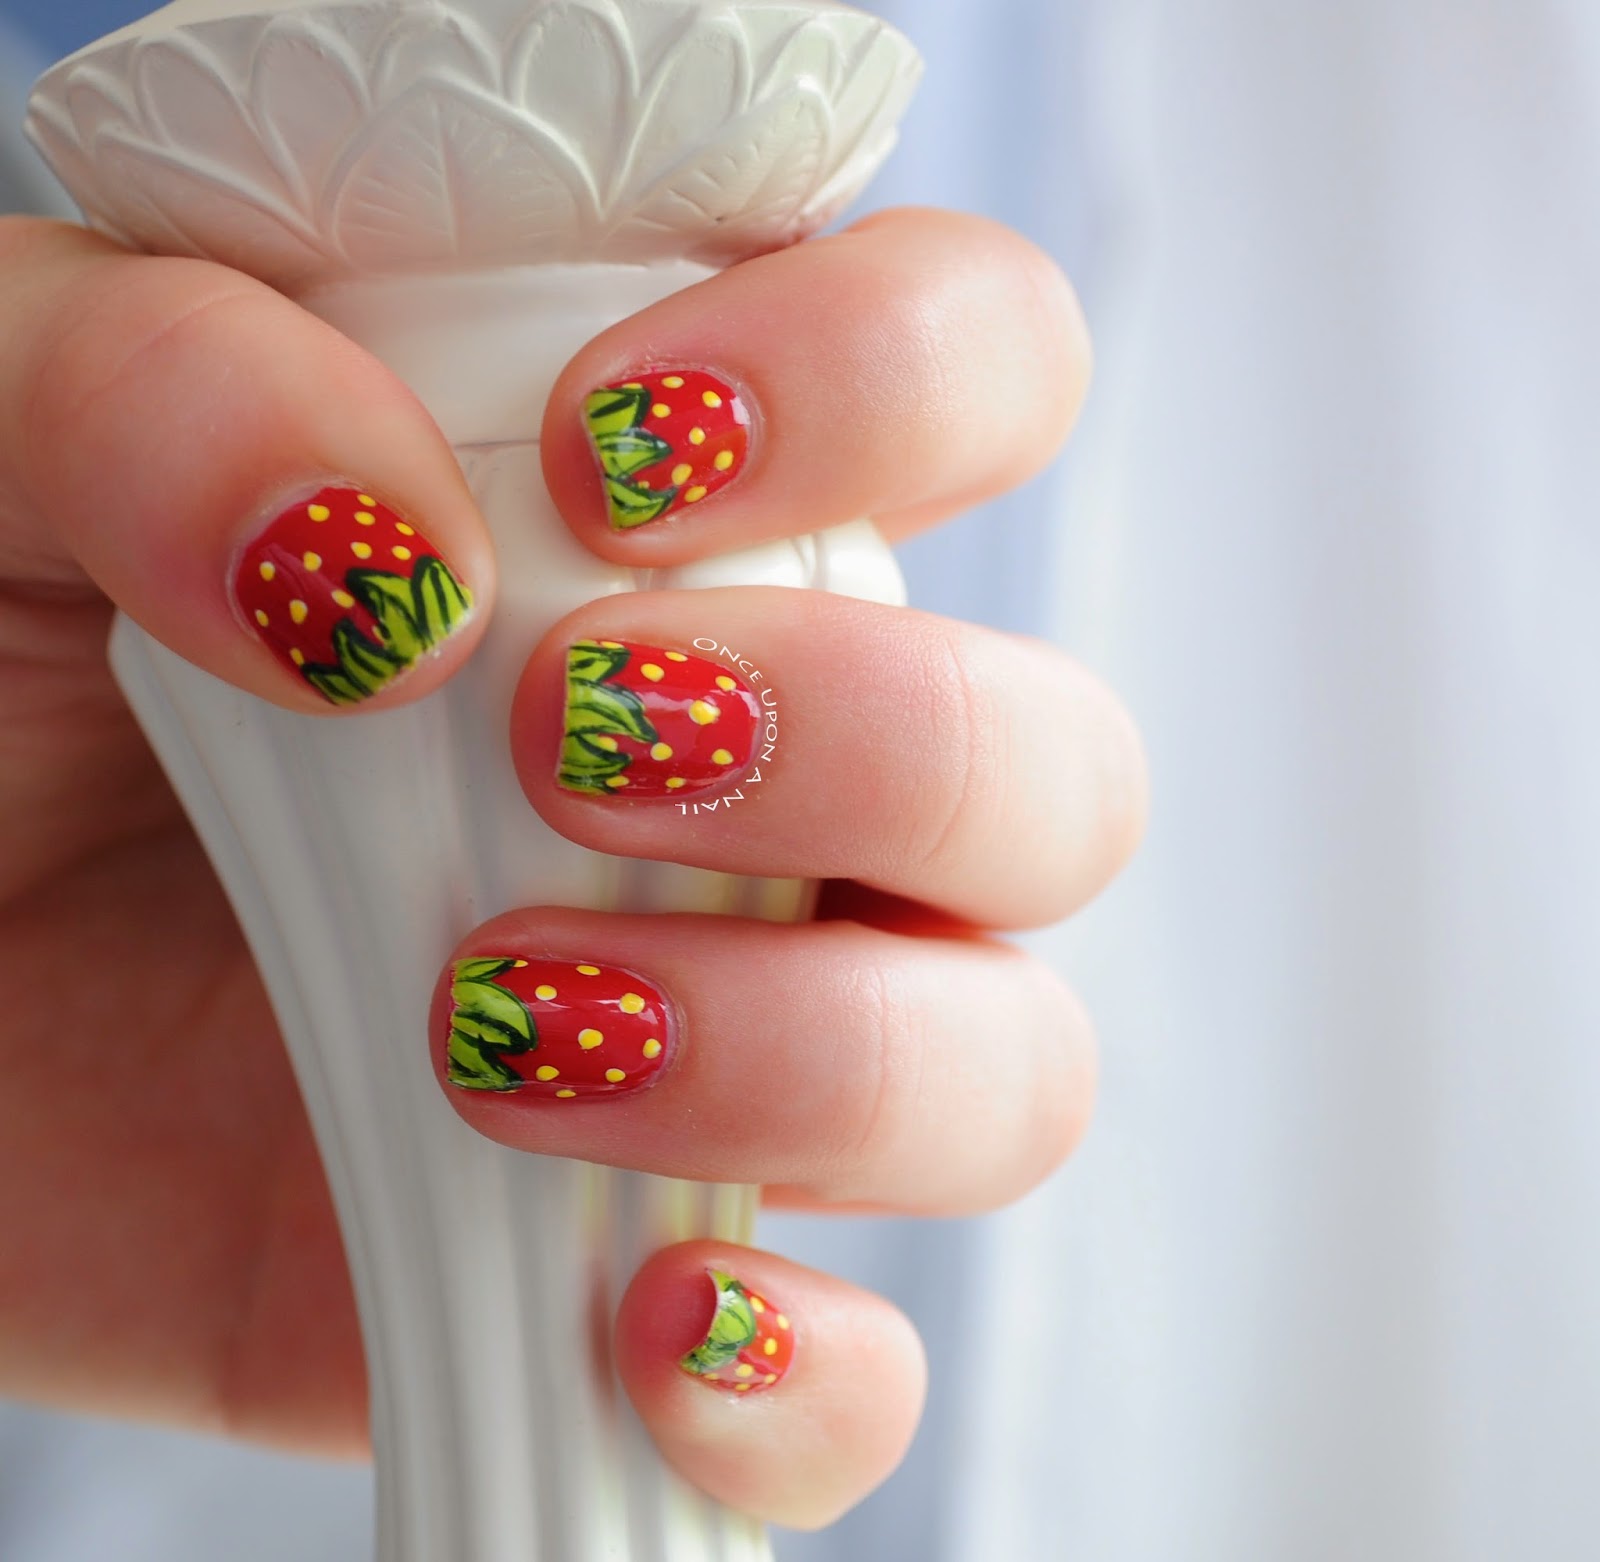
   I had time to paint my nails this week after all! I had an unexpected day off, so that gave me time to finish everything early and get my own painted. They are the promised strawberries, which is another installment in my Etsy-to-Fingers project.
(Pardon the pictures, the color is a little wonky; it's been raining practically all week so my lighting has been terrible!)


    Overall, I'm satisfied. I had different plans for the leaves, but they weren't cooperating. They work well enough though!


   I used Sally Hansen Xtreme Wear Cherry Red for my red base. I made the seeds by first making white dots with polish from my Stripe Rite striper, then going over the white with Sally Hansen Xtreme Wear Mellow Yellow. For the leaves I also painted with white first, to make sure the color comes out brightly over top the red. Then I painted over the white with L'Oreal New Money. After that I thinned out some of Revlon Parfumerie Balsam Fir with OPI's polish thinner to paint the outlines on the leaves. Then I sealed it all with my fancy Seche Vite top coat!


   I think it's funny that out of all of my designs, I've gotten the most comments from this design. Strawberries are just cute and summery! And I'm sure the bright red helps it to be noticed more too.
   As I mentioned, these are an Etsy set. This is one of the first sets I listed, back when I first decided to sell fake nails. The design looks a little different now, but it's basically the same. You can find the listing here in my shop.
   I painted my toes again, so I should have another update for you sometime next week, once I get around to taking pictures of them.

   I hope you all have a wonderful weekend!

Wednesday, May 14, 2014

Shirts!

    Last week I decided I would be creative and make a bleach pen shirt! I looked around on Pinterest for inspiration and instructions. This pin ended up being the most useful instruction-wise:

http://takeyourvitaminc.blogspot.com/2011/07/bleach-doodles.html

   Her shirt is so pretty! And she gives some really useful tips. Like that letting the bleach dry all the way gets you a white line, as opposed to washing the shirt with the bleach still wet, which leaves behind a little color. It seems like common sense, but I didn't think of that!

   So I bought myself a pretty blue shirt for $2.50 (they were on sale at work, so I got it extra cheap!) and went next door to Meijer and bought a bleach pen.
   I drew out my design on the shirt and let it dry. I had a lighter shirt, so I wanted completely white lines. Then I threw it in the wash and anxiously waited for it to finish.
   Then I pulled it out. Looked at it. And.... Nothing! The shirt looked exactly the same as it did before I bleached it! So, naturally, I tried it again. Surely it would work this time! I let it sit even longer, thinking that maybe this shirt just needed longer to absorb the bleach.
    This is the shirt after two tries:


   It still looked exactly the same as when I bought it (except maybe a bit more wrinkly).
   Determined to make a bleach pen shirt, I decided to try it again. Only this time, I bought a different shirt.
   And it was a completely different experience! Within minutes of putting the bleach on the shirt I started to see the color fading. So now I know not to buy Jerzee shirts for bleaching. Who knew they made bleach resistant shirts?!
   This is my third attempt:


    I didn't let it dry all the way; my lines were too thick for how absorbent this shirt was. The bottom design was about halfway dry when I put it in the wash, and the top design was barely on there - pretty much just long enough for me to draw the design.
   I had to draw it in three different segments. I drew the bottom design first. Then after washing/drying I drew the front half of the top design, washed, dried. Then the back half of the front. I had to split the top design into two parts because I couldn't spread the sleeve out like I wanted for the design I had in mind.

   Here are some tips of my own:
  •  If you don't want spots on your shirt like mine has, let the bleach dry all the way.
  •  To get thinner lines, hold the pen farther away from the shirt. You almost have to drag a short line of bleach behind you, if that makes sense.
   I still have some bleach left, so I'll probably make another shirt. At some point. Ha.

   Have a great week guys!

Swatch

   No designs this week. I had planned on having some cute strawberries to show you guys, but it didn't work out. I've been swamped with large orders from my Etsy shop, so I'm painting those this week instead of my own nails. (I had one person order 14 sets! Definitely my largest order yet.)
   I can't bear to not have anything on my nails, so I tried out a new color I bought a few weeks ago.


   It's L'Oreal Collection Privee Doutzen's Nude. I think it is my favorite color! It's such a pretty color that's just barely pink. It adds color, but itsn't too loud or obtrusive. I love it!
   In the picture I have on 3 coats, but you only need two. I had to add a third because I smudged a couple nails and didn't feel like redoing them all. Two coats looks basically the same as three.

    Really short post this week. I'll hopefully have some strawberries to show you guys next week!
   Have a wonderful week!

Wednesday, May 7, 2014

Natural

   I don't have any designs to show you all today. I thought I'd show you guys my nails without anything on them.
   They aren't nasty or anything, but they aren't particularly pretty either. I'll be the first to admit that I don't do much in the way of nail care beyond filing. That's just me being a slacker and wanting to spend my time on other things. Most of my nails look fine, but my ring fingers are always ever so slightly yellow, no matter what I do! I have no idea why, it makes no sense.


   Other than that, my nails generally look fine. Sometimes at work I'll get them bent or something pushing some fabric in a really tight squeeze. My pinky is like that now, it has a white line a little past the natural white. You can't really see it though in this picture.
   I shouldl probably try some whitener and other nail care things, but, like I said, I prefer to spend my time and money other other things right now.

Tuesday, May 6, 2014

More Flowers

   I had another slight deviation in my Etsy-to-Fingers Project. I've been dying to recreate this design for my fingers, so I made it in to an Etsy set and painted it on my fingers yesterday.


   I originally painted it on my toes. I'm almost embarrased to show it, but here it is. They look so different! I think the lines on the leaves make the most difference.


   I was inspired by The Illustrated Nail. I saw a nail wheel of hers on Pinterest and fell in love. Her designs are all so cool!


   This one took a lot longer than my first attempt. I definitely knew more of what I was doing this time around. Thanks to Wonderously Polished's wonderful tip about polish thinner, designs are so much easier to make!


   I used some of my new polishes for this design. Sally Hansen Xtreme Wear Mellow Yellow was my base. For the flower I used Sally Hansen Xtreme Wear Coral Reef. Revlon Brilliant Strength Entice is the green middle and my red Stripe Rite striper was used for the flower outlines. The purples in the very middle of the flower were China Glaze Sweet Hook (light) and CoverGirl Outlast Vio-last (dark). The leaves were made with L'Oreal New Money as the light base, and my new Revlon Parfumiere Balsam Fir as the dark outline.


   As I mentioned, I did make this into an Etsy set! I'm not sure whether to hope that people buy it or not, it was a ton of work! But it's so pretty, I can't help but want to let other people wear it if they want. It was fun to paint too, so the time doesn't really bother me. I'll just watch movies and have fun!


   You can find the set here in my store.

   In other news, I've started a tumblr! It will have pretty much the same thing as my Facebook (a shorter version of this blog). I'll probably throw in some other junk every now and then, like some pictures of these cute baby birds we have living in the space in between the floor of our top deck and the roof of the lower deck.

   I have some more updates coming later this week, I think.
   I hope you all have a great week!

Sunday, May 4, 2014

Minnie Mouse and Commissions

   So I finally made my Minnie Mouse design into an Etsy set! It took me forever to finally get around to it.


   I don't have much new to say about it. This is the original post, if you want to read. You can find the set here in my store.

   I also have some commissioned sets to show you guys! I was working with the lovely lady that commissioned the sets I showed you all earlier (plaid, blue daisy, black daisy).


   I really liked how this one turned out. It seems somewhat Victorian to me, with the stripes and roses. I'm still not satisfied with my ability to make large roses, but it works.


   This one was... interesting to make. For whatever reasons, I had the hardest time this one. I had to redo a couple of them and they didn't turn out quite right. But, overall, I'm satisfied and I hope she will be too!


   I thought this one turned out really cute! Very light hearted and Springy. (Apparently hearted isn't a word. I tried hearted, lighthearted, and light-hearted, but all those are wrong! Spell check kept giving me heated. You'd think that one of those would be a word, since "light hearted" is a commonly used expression...)

   I'm not very talkative tonight, apparently. Which can be nice, I suppose! Makes the post short and sweet. I should have at least one more post for you guys this week. I'm painting my own nails tomorrow, and I will finally update my chevron accent set! I can't believe it's taken me this long to do it...

   I hope you all have a fabulous week!