Tuesday, August 26, 2014

Disney Princess Challenge #10: Aurora


   I knew I would be busy between school and the street fair (it’s two weeks away!), but I might have underestimated how busy… And it didn’t help that I had no great ideas for this design and had to redo it several times. Not having 3 out of 5 classes being art classes really makes a difference on my workload! I have so much more reading to do, it’s crazy.

   Anyway, back to the nails! I didn’t expect Aurora to be this difficult. I originally thought to have briar roses and an accent of her magicked blue/pink dress. But it kind of looked awful. The dress looked really goofy. So I scratched that and tried it again, only this time with one briar nail instead of all but one. It still looked awful.  So I tried yet again and came up with this:


   I ended up with briar roses on two fingers and a middle accent of her tiara. For the briar roses I used one of my favorite base colors – Revlon Colorstay Pale Cashmere. Then I used Revlon Colorstay Red Carpet to make the roses, and I used Finger Paints Paint Me Happy for the highlights. To make the thorns I used my black Stripe Rite striper. I started with just the branch and then I made the thorns.


   For Aurora’s tiara, I started with a base of Revlon Colorstay Buttercup. I thought it was reminiscent of her hair. For the actual tiara I used Maybelline Color Show Bold Gold. Details were not great with this one, so it’s pretty plain.

   I will make it into an Etsy set, I’m just not sure how yet. I’m thinking just briar rose accents on the thumbs and middle fingers. Nothing else really looked great. I’ll post a link to it in my next post, probably, and I’ll update this post too.

   Cinderella is next! She’s on my fingers now actually. I hope to blog about them later this week so that I don’t get too far behind. Hopefully I can get to where I can have at least one post per week.

    I hope you have a fantastic week!

Thursday, August 14, 2014

Disney Princess Challenge #9: Ariel

   Once again, it's been a while. But at least I warned you guys this time! My friend and I are moved in to our new apartment and are organized and settled. We're even almost done decorating! At some point I'll have to show you guys some pictures.

   On to the nails! Last week I painted Ariel from The Little Mermaid. I wasn't sure at first how it would turn out, but I ended up really liking the end result. Moving really took a toll on them though and they ended up coming off way to soon for me.


   I ended up going for the simple route, and just painted her tail and her seashell bra. For the tail scales, I used a base of Revlon Brilliant Strength Entice. To make the scale outlines, I added some white to Entice and thinned it out a bit.


   For Ariel's shell bra, I painted the tips of my middle finger with Nina Ultra-Pro Lilac-ing Discipline. Then I made some "shadowing" lines with Covergirl Outlast Vio-last. Then I sealed each nail with a top coat!


   As usual, this is available in my Etsy shop! You can check it out here.

   Next is Sleeping Beauty! I wasn't particularly pleased with how her design came out, so it will probably be coming off soon, if time allows.

   I hope you guys have a fantastic week!

Friday, August 1, 2014

Disney Princess Challenge #9: Belle

   This week's Princess is my favorite! Beauty and the Beast has been one of my favorite fairy tales for as long as I can remember. I'm sure part of it when I was younger was just a little influenced by the giant library the Beast gave Belle. Just a smidge. I just like the story, mostly.
   I didn't quite know what I wanted to paint for Belle's design, despite having it 'all planned out'. I knew I wanted to have some of the stained glass, but other than that, nothing else was really jumping out at me. I ended up just painting the stained glass nail and running around with the other nails solid yellow for a day before it hit me. Simpler was better, but just yellow was too simple. I added a couple roses and it was perfect!


   I absolutely love this design! I'm sure it helps that I really like Beauty and the Beast and flowers... My yellow base was Revlon Colorstay Buttercup. (Have I ever mentioned that I really like that brand?) For the roses I used Finger Paints Paint Me Happy and Plum Perspective as my bases, and added various amounts of white to get all the different shades. For the leaves I used L'Oreal New Money as the base and Revlon Parfumerie Balsam Fir for the darker flecks.


   The stained glass ended up being easier than I expected. Not that it wasn't difficult (because it sure was!), but just not as difficult. I started with a base of Sally Hansen Complete Salon Manicure Barracuda and outlined my nail in Sally Hansen Complete Salon Manicure Butterscotch. To make the rose, I started with Finger Paints Paint Me Happy for the petals and L'Oreal New Money for the leaves and stem. Next, I made the black stained glass lines with my Stripe Rite Striper. (I found that it was easier to fill in the lighter pink and darker green after making the stained glass lines.) Then I sealed it all with a top coat!


   This is available in my Etsy store, you can find it here.


   Up next is Ariel! I'm not 100% sure what I want to paint for her yet either, so it'll be a surprise to you and me!

   I hope you all have a wonderful week!

Wednesday, July 30, 2014

Disnrey Princess Challenge #8: Jasmine

    Once again, I've fallen behind... But like I said in my last post, I probably won't be consistent again for several more weeks, so bear with me!
    This is last week's design, but only by a little; I just repainted my nails yesterday. Jasmine was next in line! While scrolling through Pinterest when I first started "researching" for this challenge (I have to have it all planned out in advance, you know), nearly everyone had the same thing for Jasmine - some variation of her headband/tiara/jeweled-thing and tiger stripes. Which is great and all, but I wanted to do something different. Then I realized that there's not much to draw from with her costume. After digging a bit more I remembered a lady over in deviantArt who made historically accurate Disney princesses. I really liked the bodice design on Jasmine so I made that into my 'different' element.


    Fittingly enough, I dived into a "whole new world" of nail art - 3D nails. For the headdress I used some little sparkly gems. I couldn't find a blue that I liked that was small enough, so I deviated from Disney's design and made it silver instead.


   I used 3mm gems and attached them with nail glue. I also put a topcoat over top it all just to add another layer of protection. My mom and I were running a bet to see how long the gems would last. Neither of us were very optimistic and thought a day, maybe two. I did lose one on the second day, but all the others stayed on for four days! They probably would have stayed on longer except that I had a fidgety spell and picked them all off one night. Oops.


   My base color for the majority of my nails was a new color and a new brand I had never seen before - Studio M Blue Ming. I don't know how the rest of the brand is, but I was very pleased with this color. It wasn't too thin, I only needed two coats. I'd buy more of the brand, except that they have pretty much only super bright colors. Which is great if you're into that, but I'm not.


   The gold band was made with Maybelline Color Show Bold Gold. On my thumb, the darker teal vines were made with a thinned out Flower Good Bud-dy. I made the flowers with a thinned out Finger Paints Paper Mache.


   For Rajah's tiger stripes I used a base of Sally Hansen Xtreme Wear Sun Kissed. After studying several different tiger stripe designs and giving myself a good pep talk, I made the stripes with my black Stripe Rote striper. I know animal stripes and patterns are super in and done by so many people, but they just make me nervous! I know it's silly, and this wasn't too hard, but they just always seem so difficult to me!
   So I ended up crossing two new milestones with this design - 3D nails and animal prints!


   As usual, this is available in my shop! You can find it here. No options for this design, although I loved the vine nail so much that I made it into its own set! you can find that set here.


   As I said in the beginning of this post, I've already painted my nails again. Belle is next! She's my favorite princess, so I was super excited for this one to come around. I really, really like how it turned out and can't wait to show you guys! I think she is my favorite design so far.

   I hope you all have a fantastic week!

Sunday, July 20, 2014

Watercolor Floral

    I've had my toes newly repainted for about two weeks now, I just have been too distracted by Princess nails to post about them! I was inspired by a pretty print I found lost in a board on my Pinterest.


   I was cleaning out some boards and found this one and knew I had to paint it! I started with one of my favorite bases, Revlon Colorstay Pale Cashmere.


   I thinned out the polishes I used for the flowers and leaves to give it more of the watercolor effect. I used L'Oreal He Red My Mind for the reddish flowers. The yellow flowers are made from Sally Hansen Complete Salon Manicure Butterscotch. The brown flowers and brown insides were made with a very thinned out Finger Paints Sketchy Character, and the leaves with Revlon Parfumerie Balsam Fir.


   This was super easy to make! Once the polish is thinned out, I just blobbed the polish on in flower-like shapes. I tried to make it mostly yellow flowers so it wouldn't be too bright or dark. Then I filled in the empty spaces with green leaves.


   As has seemingly become the norm, I have made this in to and Etsy set! I really like how it turned out and am super excited to paint it on my own nails. You can find it here in my shop.

   I painted my Jasmine nails yesterday! I hope to have a post up sometime this week. I have, quite fittingly, ventured in to a 'whole new world' of nails, 3D nails! I'm super excited to show them to you all!

  I hope you all have a wonderful week!

Friday, July 18, 2014

Disney Princess Challenge #7: Mulan

   This week's princess is Mulan! I was kind of stumped at first, I couldn't decide which version of her gown I wanted to create! After much deliberation, I finally decided to go with the one I knew the best, her original green gown. I also threw in her pretty little comb.


   I wanted to try and paint her warrior-garb, but I didn't. I've kind of been pressed for time still, so I didn't spend the time trying to figure it out.


   After looking at some other Mulan-inspired designs, I decided against her blue belt-thing-that-I-don't-know-the-name-of. I just never found a design where it looked like it really fit in. So I just painted the top of her gown.


   For the bodice-nails, I painted a base of Revlon Colorstay Buttercup. I didn't have the green I wanted, so I mixed a bit of white to L'Oreal New Money and painted a V, filing in the outside. I outlined the V in Revlon Colorstay Spanish Moss.


   For the accent comb-nail, I started with a black base, Sally Hansen Xtreme Wear Black Out. Then I painted the basic comb shape in white. I filled that in with teal, Flower Good Bud-dy. I painted the black lines with my black striper, and painted in the gold outline with Sally Hansen Complete Salon Manicure Butterscotch. Then I painted the lily-that-ought-to-be-an-orchid in white and painted the middle with a light pink, with yellow dots.


   And, as usual, this is available in my Etsy! You can find it here in my shop.

   Next up is Jasmine! I hope to paint them soon, maybe tomorrow. I hope you all have a fantastic weekend!

Friday, July 11, 2014

Disney Princess Challenge #6: Tiana

    First off, I know I've been super inactive the past few weeks. I've had tons of stuff to show you all, but I just haven't found the time to blog! :( While I'd love to blame it all on work, that's not completely fair. My work schedule has picked up again (hooray for more money!), so I haven't had as much free time and what little I do have is often spent cramming in Etsy orders. But it hasn't been all work, work, work. I just haven't made the time to blog like I had been doing. I'm hoping to become more regular again, but I might not until September.
    Speaking of September.... I am going to be taking part in a street festival! I'm going to have a booth and see how selling my fake nails works out. I'm super excited, but also a little nervous. I've never done anything like this, nor have I heard of nail people selling fake sets, only actually painting nails. It'll be a giant experiment. I'll have some more details soon.

   And on to nails. This is actually last week's design, but who's counting! Last week was Tiana from The Princess and the Frog. I based this one off of her green gown. I call it her transformation gown, this one -


   I based my design off of the "petals" on her skirt and the lily around her waist.


   I didn't really have the right colors at the time that I painted this on my fingers, so I did a lot of mixing. I added a ton of white to L'Oreal New Money and brushed it on for the base. Let me tell you, using a smallish brush to paint your whole nail is more than a little annoying. So greatful I don't have to do that all the time!


   To make the petals I mixed a fair amount of white to Revlon Parfumerie Balsam Fir. Then I outlined them with my white striper. I tried to not make it an exact outline, but I found out I'm not too great at that. Oh well.  I also painted a light glitter coat on top of the dark green mix.


   The lily is by far my favorite aspect of both her dress (except for maybe the petaled part on the bodice) and my design. I used my white striper to make the lily. Revlon Parfumerie Balsam Fir was used for the leaves. I thinned it out a bit to make the curly vines.  I used Revlon Colorstay Buttercup to put little yellow dots in the middle of the lily.


   As with the others, this is available in my Etsy shop! ...And, not surprisingly, I have many options. You can buy the original full dress design (petaled fingers and lily accent), as well as solid light green with accent or solid dark green with accent. Just in case you wanted something super simple. Or whatever.
   You can find the set(s) here in my shop!

   I have a couple more sets to show you all, but for now I'm done. It's late and I'm sleepy! (And I'm almost done with my book! And I have to finish it tonight, you know...) Hopefully I'll at least get in this week's Princess (Mulan) before I paint the new Princess (Jasmine)! I don't want to always be a week behind...

   At any rate, I hope you all have a fantastic weekend! My friend and I are going to hang out tomorrow, so that'll be a bunch of fun. I'm super excited!

Thursday, July 3, 2014

Lost Nails.. :(

   So I was cleaning out my folders on my desktop and found some designs I had completely forgotten about! They aren't super old, just a few months late. Oh well. You're seeing them now, so that's all that matters, right?

   This first one was made back when I painted my watercolor ombre toes. I really liked how it looked so I made it into an Etsy set. I'm not sure why I didn't post about it when I wrote about my toes, but I didn't!


   You can find this set here in shop.  As usual, I have to offer some options. I currently have it to where you can order blue, pink, purple or grey/white. I think the blue is my favorite though. It all goes back to that love of the ocean...

   This next set was made right after my Elsa set. I have a ton of glitter sets in my shop, but after making the glitter tips for Elsa, I thought that would be a good addition to my glitter cache.


   You can find the set here in my shop. As of right now it's just available in this icy blue. There might be more color options later, you never know!

   I absolutely love this next set! It was a custom order from a few weeks back that just got lost in all my Disney craziness. It is super cute though, and I can't wait to put it in my shop.


   I didn't think I would like the roses at first, but I ended up really liking them. You can't look at them too closely, or else they look like a jumbled mess, but other than that I think they turned out pretty cute. They're pretty good at-a-distance-roses. So many of the roses I make that look halfway decent up close look like nothing but a red blob from far away. They're definitely something on my Picky-Sarah-To-Do List.

   This next set isn't technically lost. I painted it last week on my cousin! She wanted some pineapple nails so we found a couple cute designs and mashed them together. This isn't the best picture, but oh well.


   I really like this one! I think I'm going to eventually get it up in my shop. It would be a cute summer/beach set. It was inspired by this pin and this pin. It was a lot of fun to paint. Pineapples are pretty easy to make!

   That's all for tonight. I know I've gotten kind of irregular again, but the past two weeks have been kind of crazy between VBS, work, and entertaining my cousin! I should a have a new post soon though. I just painted my Tiana design on my fingers and I finally painted my toes again!
   Have an awesome week!

Wednesday, June 25, 2014

Disney Princess Challenge #5: Rapunzel

   I was super excited for this week's design! Tangled is probably my favorite Disney princess movie. As with all my other princess designs, the bulk of the design is inspired by the character's clothing. I'm just a clothing freak; I can't help but really get into the costuming. For Rapunzel I also incorporated her painting of the "floating lights" and the lantern scene at the castle, since both are pretty iconic to the movie.


   The design on my purple fingers was taken from the detailing on her skirt. It's a really pretty design, I think. I started with a base of Nina Ultra Pro Plum of the Earth. Then I drew out the design with my white striper and another thin brush. Once that dried I painted over the white with either the light blue (Sally Hansen Complete Salon Manicure Barracuda) or light purple (China Glaze Sweet Hook), depending on where it was wanted.


   To make the castle lantern scene, I did a ton of sponging, and was very grateful that I have small fingers so that details (and mistakes) are not easily seen. I painted a white base, and sponged on some light purple in the middle and a few shades of blue around the edges (more blue on the top than the bottom). Then I painted the castle in black with a small brush and sponged some purple mist on the middle of the castle, and purple water over the reflection to smudge it some. Then I painted the lanterns with yellow.


   The floating lights painting was a ton less stressful to paint! I started with a white base again, and then painted the green hills and dark green trees. I made the sky the same way as my watercolor ombre design with several shades of blue. Then I painted Rapunzel and the lights.


   As with the other princesses, this set is available in my Etsy shop! I have an option for both accents, the castle lantern scene and the floating lights painting. You can find them here in my shop.


   I think that's all for now! I might have another design or two to show you all later; we'll see what I have time for. (This week is kind of hectic.) Next up is Tiana! I really liked The Princess and the Frog, it was a pretty good movie. Although, I must say, I could not have watched it as a child - all those voodoo songs would have given me nightmares!

   I hope you all have a wonderful week!

Wednesday, June 18, 2014

Disney Princess Challenge #4: Merida

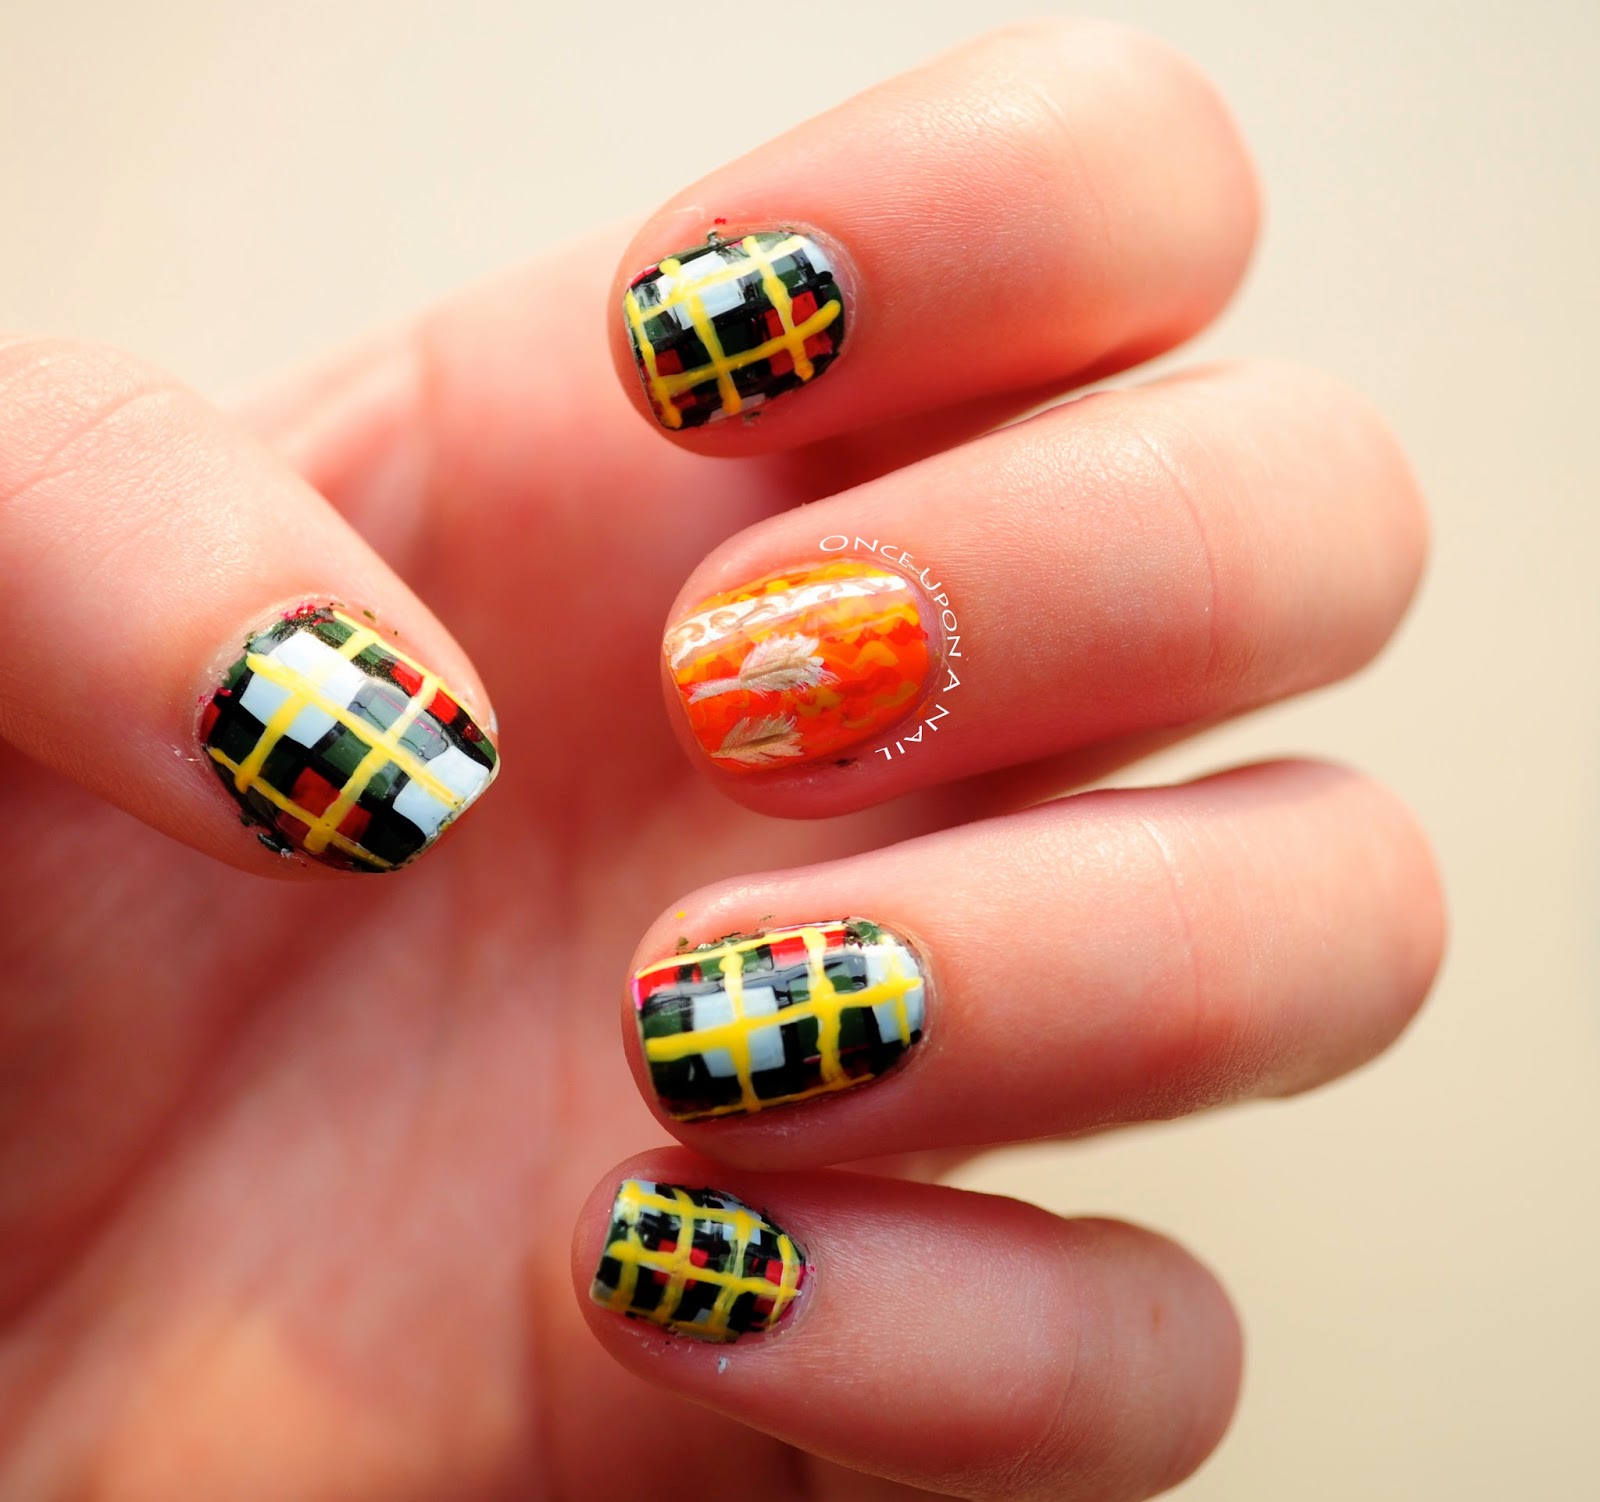
   This week's Princess is Merida from Brave! I didn't know exactly what I wanted to put in the design, but I knew I had to include her fiery hair. I eventually found a couple pictures of her clan plaid, so I decided to put that in the design as well.


   You can see her plaid pretty good in the first picture. I also thought the design on her bow was really neat, so I tried to tie that in as well. In my search I found this picture and I thought it was hilarious; that's totally a face I would get caught making - 


   Her hair was hard to figure out how to make, it's why I gave up and painted Pocahontas last week. I ended up painting an orange base (Sally Hansen Sun Kissed), then making squiggly lines with yellow (Sally Hansen Complete Salon Manicure Butterscotch) and a dark orange (L'Oreal He Read My Mind).


   Making the plaid was complicated, but not as time consuming as I expected once I got the hang of it. I started with a base of dark green (Revlon Parfumiere Balsam Fir). Then I blocked off my nails with a white striper, filling in some squares to make a checker board of sorts. I painted some blue (Pure Ice Bikini), some red (Revlon Colorstay Velvet Rope). I outlined everything with a black striper, then painted white lines, going over them in yellow.


   I didn't like the hair all by itself, so I threw her bow and arrows over top to distract from the hair. I used a cream striper, and made the details on the bow with Nina Ultra Pro Beige-A Vu.


   I have this set in my Etsy. I added another option for a set with just plaid, in case someone doesn't want the bright orange or something. You know me, I always have to give some options. I can't help myself! You can find it here in my shop.

   Rapunzel is up next! I'm super excited for hers, Tangled is my favorite Disney princess movie. She's not my favorite princess (Belle is my favorite), but I loved the movie!
   I hope you guys have a great week!